
This is another installment of past tutorials of mine which have lost their original host site. Enjoy!
In the past, I had a bin full of stencils gathering dust. I used to look at them mostly as a tool to use as templates or with pencils, markers, and dry embossing stylus tools. But there are so many more ways to use them and create stunning results . . . If you have stencils that coordinate with your prints or your stamps, then there are so many more ways to tie them into your finished pieces! Why not use the inks that you are already using with your stamps on the same project, but incorporate your stencils into the work, or the same embossing powders, etc?
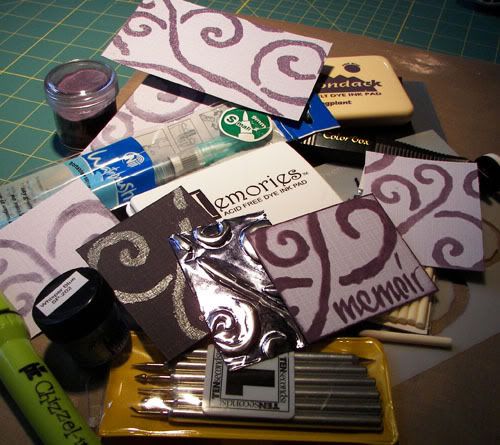
To use your ink pads, pair them up with some wonderful tools. There's the ColorBox Stylus, Ranger's Cut 'n' Dry Foam, Ranger's Ink Applicator Tool, cosmetic sponges, Ranger's Cut 'n' Dry Nibs, Provocraft's Chizzel-It, Niji's Waterbrush, regular paintbrushes, and more! Alternately you can use liquid or dimensional paints, dry embossing tools, Ranger's Perfect Medium Marker or VersaMark's Marker and embossing powders, pigment powders, or chalks, etc.
Remember to always clean your stencil before moving it or changing colors. Using only water-based dye inks, clear embossing ink, or paints will facilitate easy cleaning of both your stencil and your tools without damaging them.
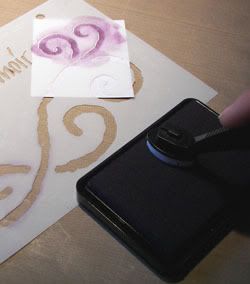
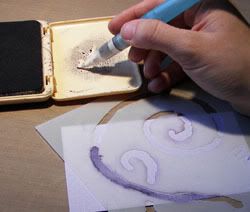
Using the ColorBox Stylus with sponge tips gives a soft but very complete image! Simply press your sponge tip gently onto a waterbased dye ink pad to pick up the color then gently press or swirl the ink through the stencil. I recommend water based dye inks because they will easily rinse off the sponges without damaging them, although darker colors may stain the sponges. Another great and similar tool is the Ranger Ink Applicator Tool. If you do not have access to these tools then you can use small pieces of Ranger's Cut 'n' Dry Foam or a cosmetic sponge for a somewhat similar look.
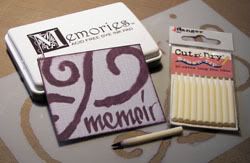
Ranger's Cut 'n' Dry Nibs give a very clear image and full strength color with your stencils. Simply swipe the Nib's tip across your ink pad before coloring through your stencil. You may use any ink that you desire to create a custom marker with the nib for using with your stencil or on its own! To change colors, clean your nib in the same way that you would clean your rubber stamps. If you have a hard time holding the small nibs, then simply empty a multipoint pencil and slide the Nib into the tip, a little glue will hold it in place better!
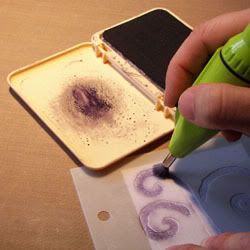
The Chizzel-It with a spinning brush tip is a great tool for creating air-brushed looks with your stencils. Delta also makes the Rubber Stampede Spin Color which works in much the same manner. To use these tools with inks (as opposed to paints) they require a little more ink than it will pick up directly from the ink pads, but a lot less than you would get from dipping it into a reinker. An easy way to work around this is to use Ranger's Adirondack, Big 'n' Juicy, Sea Brights, Sea Shells, or Stamp It Ink Pads which come in a special case, allowing you to press on the center of the closed lid to pool a small amount of ink onto the inside of the lid. Alternately, you can press your ink pads onto a slick surface like Ranger's Non-Stick Craft Sheet. In either case, simply wipe your brush, or spin it against the pooled ink or a paint of your choice and then make sure to spin the brush while working it through your stencil.
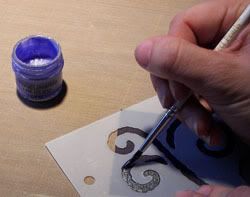
Niji's Waterbrush is a great tool whenever you wish to watercolor and it works so well with water based dye inks! It is faster than regular paint brushes with water and cleans up so quickly without requiring the dreaded open dish of water at your table! To use it with ink pads, pool your ink just like you would with the Chizzel-It, or use reinkers and simply swipe a moist brush tip through the ink and paint your stenciled image! If the brush is too moist, use a paper towel to lightly soak away excess water or add more water by gently squeezing the handle or by pressing the brush against a paper towel. You can also dilute your ink with extra water, run your inked brush across a towel before painting, or blot your painted image to lighten the result. To change colors, simply squeeze a little water through the brush and wipe it on a towel to remove the old ink from the brush. You can also use the Waterbrush with pigment ink powders like Perfect Pearls, or with traditional watercolor paints, etc. And, if you can't get the Waterbrush, go ahead and use a regular paint brush.
Paints are a wonderful medium to use with your stencils. I happened to use Radiant Pearls for this sample, but regular liquid paints (like acrylic paint) will work wonderfully. You can also take it a step further and use dimensional paints, like Delta's Texture Magic, with a palette knife to create a rich textured image.
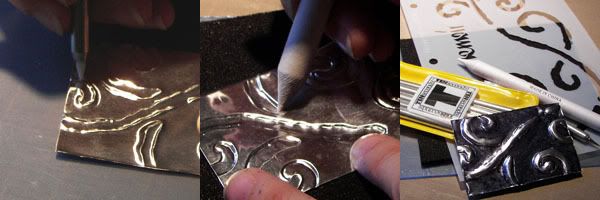
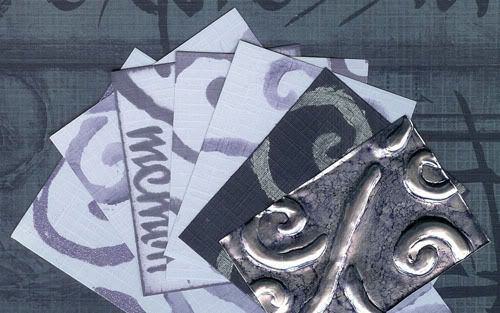
Dry embossing is always an option with your stencils and embossing metal can be quite stunning! Ten Seconds has a great line of metal tools which can be used with any stencil or printed design in order to create great pieces of art. Using their Thick Foam Mat and the Teflon Embossing Tool, simply trace your stenciled image onto the back of your scrap metal. Flip the metal over and place on their Acrylic mat to outline your lines on the right side as a stronger border. Flip the metal back over to the wrong side and use a blending tool or Paper Thumb to "puff" the image into your Thick Foam Mat, to stabilize your embossing you may want to fill the puffed areas with light weight spackle from the hardware store. You can also choose to create 3-d designs into your stenciled area or background with any of their many freehand tools and embossing molds.
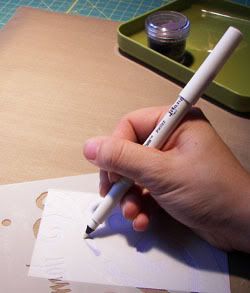
Heat embossing your image is also possible! Use Ranger's Perfect Medium Embossing Pens or Tsukineko's VersaMaker Pen to color in your stenciled image, then apply embossing powder and heat! Alternatively you may cover your inked area with Perfect Pearls, colored chalk, etc. This also is a great way to use handmade paper templates to add your own designs to your projects!
These pieces were all created with Club Scrap's The Written Word November 2005 Stencil and papers in addition to the following:
Angelwings - Radiant Pearls in Whisper Blue;
ColorBox - Stylus with Sponge Tips;
Niji - Waterbrush;
ProvoCraft - Chizzel It;
Ranger - Adirondack Alcohol Blending Solution; Adirondack Alcohol Inks in Eggplant & Stonewashed; Adirondack Dye Ink Pad in Eggplant; Antiquities Embossing Powder in Tanzanite; Cut 'n' Dry Nibs; Heat-It Craft Tool; Non-Stick Craft Sheet; Perfect Medium Embossing Pen;
Stewart Superior - Memories Dye Ink Pad in Dark Blackberry;
Ten Seconds - Acrylic Mat; Teflon Embossing Tool from Basic Kit #1; Thick Foam Mat;
These additional samples show a few finished projects that used stenciling techniques from above!
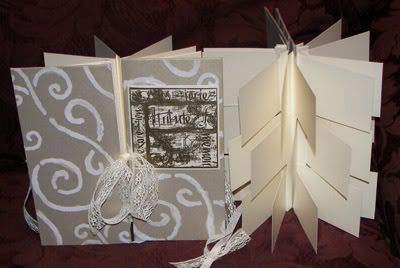
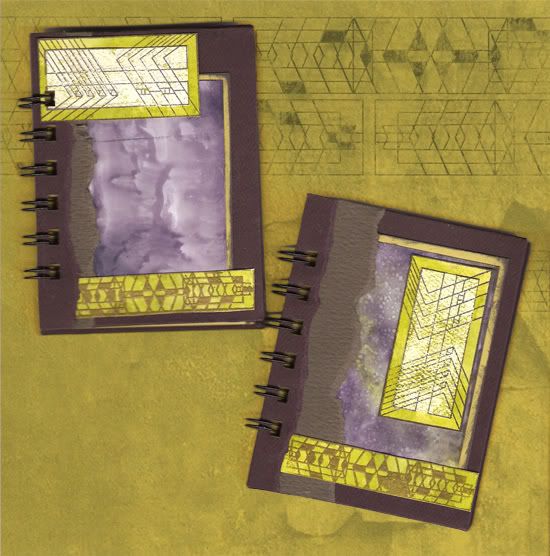
The Flag Books incorporate dimensional paint and use: Club Scrap The Written Word November 2005 Stencil & Collage Stamp, Asian Artisan January 2004 Cream Frost Paper, Time & Space December 2004 Gold Paper, Matte Board, and Bookbinding Glue; Delta Texture Magic Dimensional Paint in White (applied through stencil using a palette knife); Ranger Black Soot Distress Ink Pad; Gold Embossing Powder; Rafael Model Lace from Walmart;
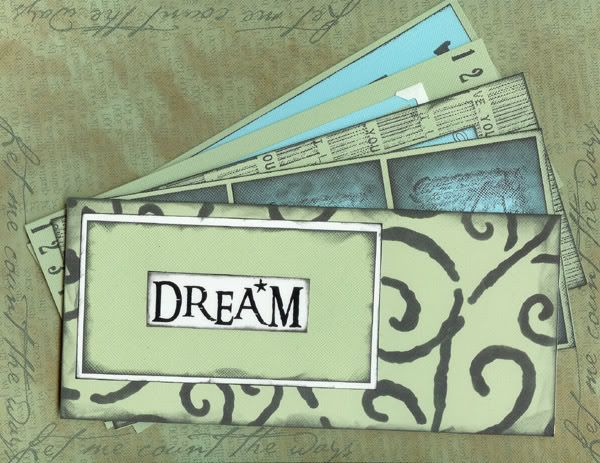
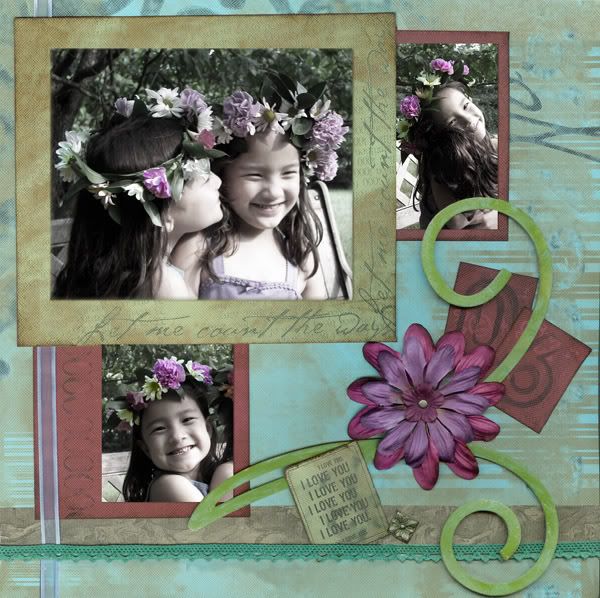
The Dream Card includes distressed edges made with the ColorBox stylus and uses: Club Scrap The Written Word November 2005 Stencil, Let Me Count The Ways February 2006 GTG and Papers, Greetings For a Year Stickers, and White Notecards; ColorBox Stylus with Sponge Tip; Stewart Superior Palette Noir Ink Pad;
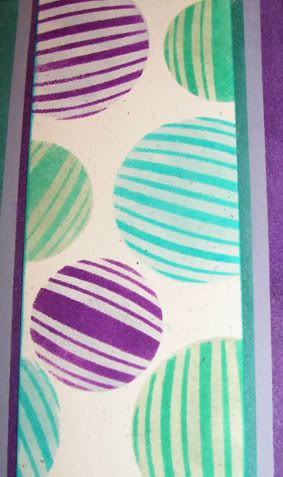
The Holiday Ornaments feature layered ink and masking tape together with the ColorBox Stylus and use: Club Scrap Holidays Stencil and assorted POPs Papers; ColorBox Stylus with sponge tips; Ranger Awning Green, Pool, & Purple Surf Sea Brights Dye Ink Pads and Cool Peri, Ocean Aqua, & Starfish Green Sea Shells Dye Ink Pads; Masking Tape;
Here are some links to other great stenciling guides online!
In the past, I had a bin full of stencils gathering dust. I used to look at them mostly as a tool to use as templates or with pencils, markers, and dry embossing stylus tools. But there are so many more ways to use them and create stunning results . . . If you have stencils that coordinate with your prints or your stamps, then there are so many more ways to tie them into your finished pieces! Why not use the inks that you are already using with your stamps on the same project, but incorporate your stencils into the work, or the same embossing powders, etc?
To use your ink pads, pair them up with some wonderful tools. There's the ColorBox Stylus, Ranger's Cut 'n' Dry Foam, Ranger's Ink Applicator Tool, cosmetic sponges, Ranger's Cut 'n' Dry Nibs, Provocraft's Chizzel-It, Niji's Waterbrush, regular paintbrushes, and more! Alternately you can use liquid or dimensional paints, dry embossing tools, Ranger's Perfect Medium Marker or VersaMark's Marker and embossing powders, pigment powders, or chalks, etc.
Remember to always clean your stencil before moving it or changing colors. Using only water-based dye inks, clear embossing ink, or paints will facilitate easy cleaning of both your stencil and your tools without damaging them.
Using the ColorBox Stylus with sponge tips gives a soft but very complete image! Simply press your sponge tip gently onto a waterbased dye ink pad to pick up the color then gently press or swirl the ink through the stencil. I recommend water based dye inks because they will easily rinse off the sponges without damaging them, although darker colors may stain the sponges. Another great and similar tool is the Ranger Ink Applicator Tool. If you do not have access to these tools then you can use small pieces of Ranger's Cut 'n' Dry Foam or a cosmetic sponge for a somewhat similar look.
Ranger's Cut 'n' Dry Nibs give a very clear image and full strength color with your stencils. Simply swipe the Nib's tip across your ink pad before coloring through your stencil. You may use any ink that you desire to create a custom marker with the nib for using with your stencil or on its own! To change colors, clean your nib in the same way that you would clean your rubber stamps. If you have a hard time holding the small nibs, then simply empty a multipoint pencil and slide the Nib into the tip, a little glue will hold it in place better!
The Chizzel-It with a spinning brush tip is a great tool for creating air-brushed looks with your stencils. Delta also makes the Rubber Stampede Spin Color which works in much the same manner. To use these tools with inks (as opposed to paints) they require a little more ink than it will pick up directly from the ink pads, but a lot less than you would get from dipping it into a reinker. An easy way to work around this is to use Ranger's Adirondack, Big 'n' Juicy, Sea Brights, Sea Shells, or Stamp It Ink Pads which come in a special case, allowing you to press on the center of the closed lid to pool a small amount of ink onto the inside of the lid. Alternately, you can press your ink pads onto a slick surface like Ranger's Non-Stick Craft Sheet. In either case, simply wipe your brush, or spin it against the pooled ink or a paint of your choice and then make sure to spin the brush while working it through your stencil.
Niji's Waterbrush is a great tool whenever you wish to watercolor and it works so well with water based dye inks! It is faster than regular paint brushes with water and cleans up so quickly without requiring the dreaded open dish of water at your table! To use it with ink pads, pool your ink just like you would with the Chizzel-It, or use reinkers and simply swipe a moist brush tip through the ink and paint your stenciled image! If the brush is too moist, use a paper towel to lightly soak away excess water or add more water by gently squeezing the handle or by pressing the brush against a paper towel. You can also dilute your ink with extra water, run your inked brush across a towel before painting, or blot your painted image to lighten the result. To change colors, simply squeeze a little water through the brush and wipe it on a towel to remove the old ink from the brush. You can also use the Waterbrush with pigment ink powders like Perfect Pearls, or with traditional watercolor paints, etc. And, if you can't get the Waterbrush, go ahead and use a regular paint brush.
Paints are a wonderful medium to use with your stencils. I happened to use Radiant Pearls for this sample, but regular liquid paints (like acrylic paint) will work wonderfully. You can also take it a step further and use dimensional paints, like Delta's Texture Magic, with a palette knife to create a rich textured image.
Dry embossing is always an option with your stencils and embossing metal can be quite stunning! Ten Seconds has a great line of metal tools which can be used with any stencil or printed design in order to create great pieces of art. Using their Thick Foam Mat and the Teflon Embossing Tool, simply trace your stenciled image onto the back of your scrap metal. Flip the metal over and place on their Acrylic mat to outline your lines on the right side as a stronger border. Flip the metal back over to the wrong side and use a blending tool or Paper Thumb to "puff" the image into your Thick Foam Mat, to stabilize your embossing you may want to fill the puffed areas with light weight spackle from the hardware store. You can also choose to create 3-d designs into your stenciled area or background with any of their many freehand tools and embossing molds.
Heat embossing your image is also possible! Use Ranger's Perfect Medium Embossing Pens or Tsukineko's VersaMaker Pen to color in your stenciled image, then apply embossing powder and heat! Alternatively you may cover your inked area with Perfect Pearls, colored chalk, etc. This also is a great way to use handmade paper templates to add your own designs to your projects!
These pieces were all created with Club Scrap's The Written Word November 2005 Stencil and papers in addition to the following:
Angelwings - Radiant Pearls in Whisper Blue;
ColorBox - Stylus with Sponge Tips;
Niji - Waterbrush;
ProvoCraft - Chizzel It;
Ranger - Adirondack Alcohol Blending Solution; Adirondack Alcohol Inks in Eggplant & Stonewashed; Adirondack Dye Ink Pad in Eggplant; Antiquities Embossing Powder in Tanzanite; Cut 'n' Dry Nibs; Heat-It Craft Tool; Non-Stick Craft Sheet; Perfect Medium Embossing Pen;
Stewart Superior - Memories Dye Ink Pad in Dark Blackberry;
Ten Seconds - Acrylic Mat; Teflon Embossing Tool from Basic Kit #1; Thick Foam Mat;
These additional samples show a few finished projects that used stenciling techniques from above!
The Flag Books incorporate dimensional paint and use: Club Scrap The Written Word November 2005 Stencil & Collage Stamp, Asian Artisan January 2004 Cream Frost Paper, Time & Space December 2004 Gold Paper, Matte Board, and Bookbinding Glue; Delta Texture Magic Dimensional Paint in White (applied through stencil using a palette knife); Ranger Black Soot Distress Ink Pad; Gold Embossing Powder; Rafael Model Lace from Walmart;
The Dream Card includes distressed edges made with the ColorBox stylus and uses: Club Scrap The Written Word November 2005 Stencil, Let Me Count The Ways February 2006 GTG and Papers, Greetings For a Year Stickers, and White Notecards; ColorBox Stylus with Sponge Tip; Stewart Superior Palette Noir Ink Pad;
The Holiday Ornaments feature layered ink and masking tape together with the ColorBox Stylus and use: Club Scrap Holidays Stencil and assorted POPs Papers; ColorBox Stylus with sponge tips; Ranger Awning Green, Pool, & Purple Surf Sea Brights Dye Ink Pads and Cool Peri, Ocean Aqua, & Starfish Green Sea Shells Dye Ink Pads; Masking Tape;
Here are some links to other great stenciling guides online!
- DawnTCB's sample Stencil Technique Tags from CS Retreat with write up on how to recreate them!
- Jac's DIGITAL Stencil Tutorial
- Janie's (janiesagmoe) MS Word list of all CS stencils and their kits
- Luanne's Stencilled Tag Tutorial
- Tricia's TVWeekly Webisode - Serengeti Mists (using Memories Mists)
- Tricia's TVWeekly Webisode - Misty-fied (using Glimmer Mist)
- Tricia's TVWeekly Webisode - Life and Art (using ColorBox Stylus)
- Tricia's TVWeekly Webisode - Artist Incognito (using Watercolor Pencils)
- Carol Duvall Candle Carving a Stencilled Image (Make one then scrap photos of it! Or make other decorative items!)


No comments:
Post a Comment