Neith"s Crafty Creations - image created with Club Scrap DigiDeluxe Refresh and Serengeti Kits
Showing posts with label Kit: 2004/01 Asian Artisan. Show all posts

Monday, April 21, 2008

15 Cards, 4 FFC Exclusive Card Kits

Club Scrap has recently created four new great 15 card Frame in Frame Greeting to Go kits! There are 4 color themes, Stratosphere, Time & Space, Games, and Asian Artisan, which each contain the same 15 card, envelope and die cut components, but in alternate color schemes! Each kit has 3 sizes of cards with 5 designs per size. Simply ink some edges and add ribbon or brads as you desire and you'll wind up with 15 great cards and a slew of extra die cuts and panels that you can use as alternates or on other creations... The die cuts are pre-printed with tons of great greetings, but you can also always flip them over and stamp your own sentiments onto them!

I've made the cards according to their instructions and have scanned some from each collection, so that you can see all of the designs, but won't have to scroll through all 60 cards! With each kit you'd only get one color scheme, but all of the designs!

Stratosphere (5 of 15)Frame in Frame FFC Greetings to Go Cards
Stratosphere theme, 5 of 15 cards

Time and Space (3 of 15)Frame in Frame FFC Greetings to Go Cards
Time & Space theme, 3 of 15 cards

Games 4 of 15)Frame in Frame FFC Greetings to Go Cards
Games theme, 4 of 15 cards

Asian Artisan (3 of 15)Frame in Frame FFC Greetings to Go Cards
Asian Artisan theme, 3 of 15 cards

Stratosphere (remnants)Frame in Frame FFC Greetings to Go Cards
Stratosphere theme, remnant die cuts and panels


Thursday, April 10, 2008

Serengeti Design Classic Kit: 12 Great FFC Exclusive Layouts

The exclusive "Crafter Classics" feature designs from long extinct kits (Architecture, Garden le Fleur, Key to My Heart, Literary, Moody Blues, Outdoor, Safari, Spice of Life, and Winter Wonderland). But, there's another FFC Exclusive Design Classic Kit that Club Scrap has created! The Serengeti Design Classic Kit uses the designs from the recent Serengeti 10/07 Kit and as a result, you can still order the stencil, stamps, and stickers which coordinate completely, as well as the same prints in the original color scheme... making this kit very expansive and easy to coordinate with!

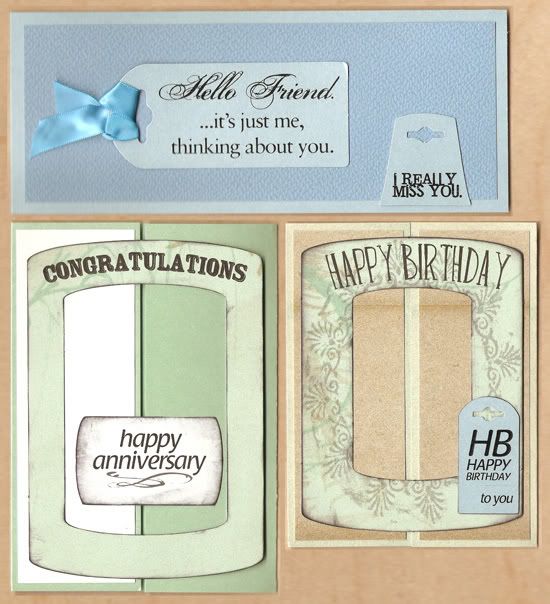
These 12 layouts use the FFC Crafter Exclusive Serengeti Design Classic Kit (it includes the papers, tags, journaling blocks, and cut out words) and its ALSB design. I've made note of anywhere that my layouts vary from the original ALSB designs!

Serengeti FFC Design Classic ALSB #1

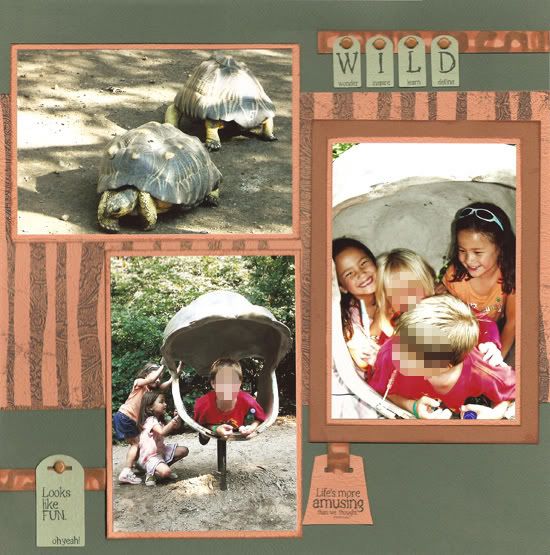
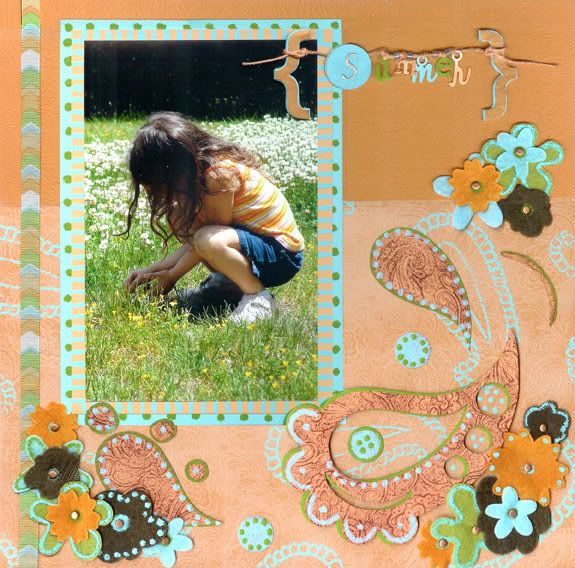
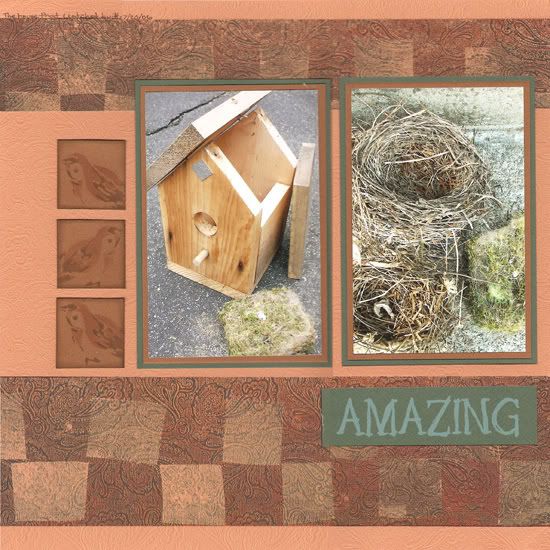
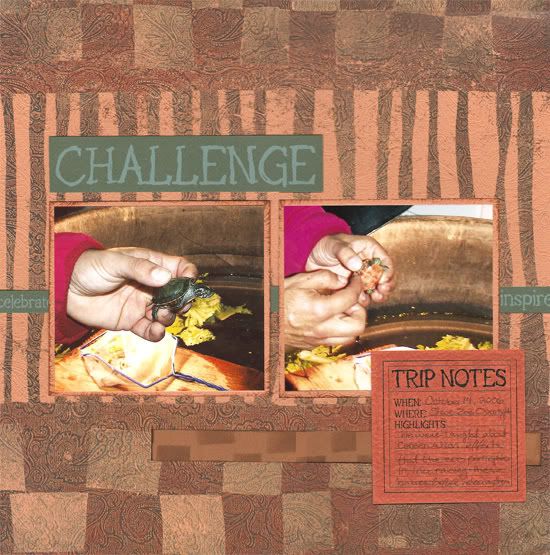
Club Scrap: Serengeti Crafter Classic 2008 - ALSB #1, Coral Print, Coral Plain, Coral Photo Mattes, Brown Plain, Dark Green Plain, Coral Tag, Light Green Tag; Serengeti 11/07 - Brads from Embellishment Side, Border Stencil;
Ranger: Adirondack Ink Pad - Ginger; Distress Ink Pad - Walnut Stain; Ink Applicator Tool;

I added a few more and different tags, brads, and stenciled strips with remnant paper from the ALSB trimmings. I also rotated the layout.

Serengeti FFC Design Classic ALSB #2

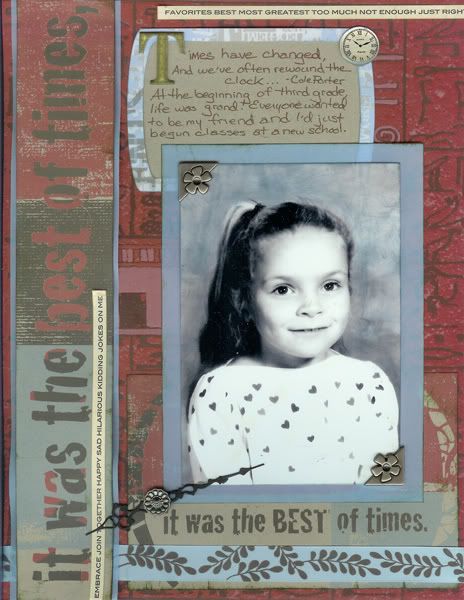
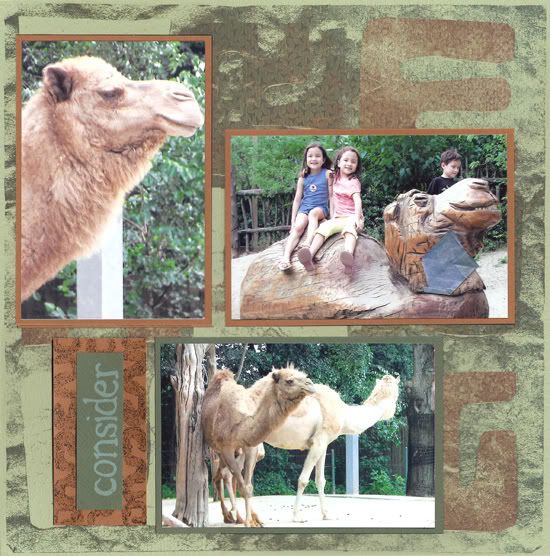
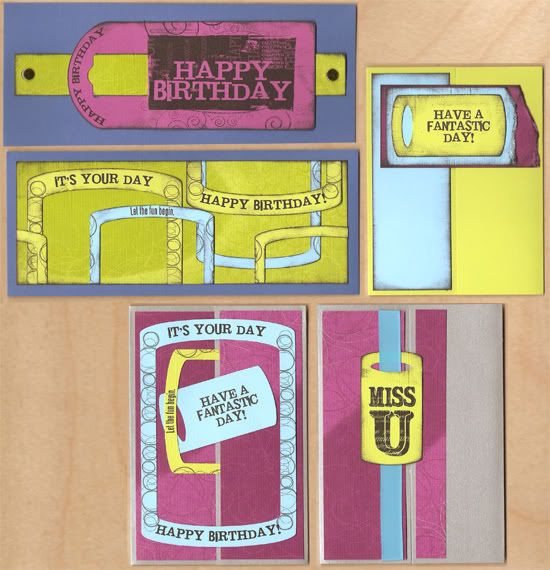
Club Scrap: Serengeti Crafter Classic 2008 - ALSB #2, Coral Plain, Coral Print, Brown Plain, Dark Green Photo Mattes, Word Cutout; Asian Artisan 1/04 - Bird & Bamboo Overlay Stencil;
Ranger: Adirondack Ink Pad - Ginger; Distress Ink Pad - Walnut Stain; Ink Applicator Tool;
Zig: Writer - Chocolate;

I simply added the stenciled birds (this is a multi level stencil with a guide to help you place the two layers of ink) and switched the word cutout.

Serengeti FFC Design Classic ALSB #3

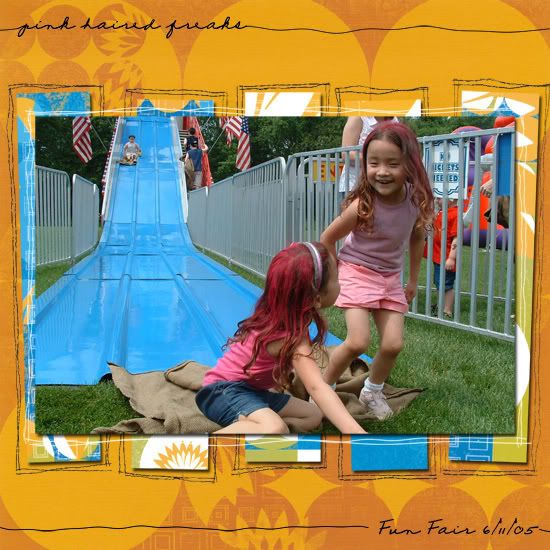
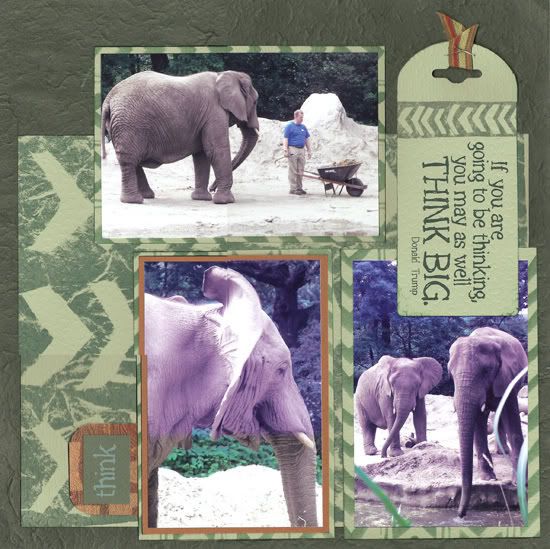
Club Scrap: Serengeti Crafter Classic 2008 - ALSB #3, Light Green Print, Brown Plain, Dark Green Photo Matte, Word Cutout; Serengeti 11/07 - Border Stencil;
Ranger - Stickles - Cinnamon;

I rotated the layout, switched the word cutout, and added the stenciled glitter.

Serengeti FFC Design Classic ALSB #4

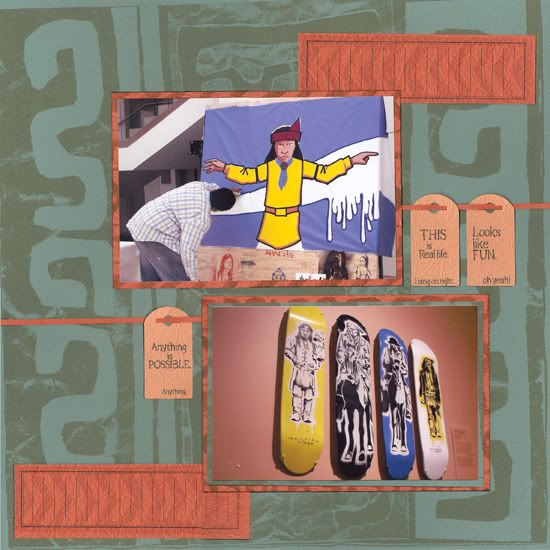
Club Scrap: Serengeti Crafter Classic 2008 - ALSB #4, Light Green 8.5x11 Print, Coral 8.5x11 Print, Brown Plain, Evergreen Handmade Plain, Light Green Photo Mattes, Light Green Tag, Word Cutout; Serengeti 11/07 - Border Stencil;
Ranger: Adirondack Ink Pad - Bottle;
Scrapbook Takeout - Celebrations 11/07 - Heidi Swapp Cargo Ribbon;
Staples;

I rotated the layout, then switched out the tag and word cutout, added staples, and a scrap of the coral print.

Serengeti FFC Design Classic ALSB #5

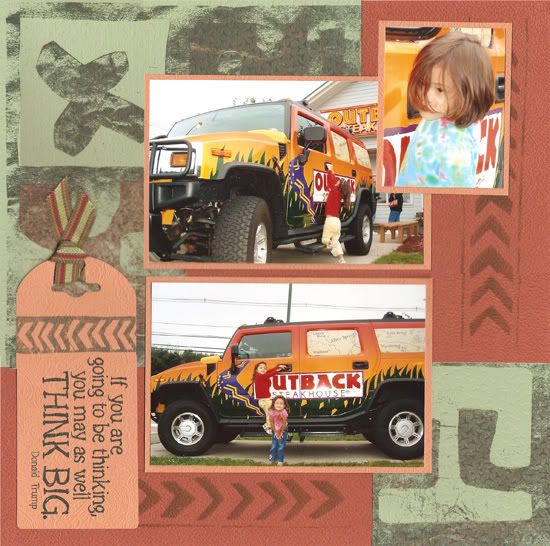
Club Scrap: Serengeti Crafter Classic 2008 - ALSB #5, Dark Green Print, Rust Plain, Rust Photo Mattes, Rust Journal Squares, Coral Tags; Serengeti 11/07 - Border Stencil;
Ranger: Distress Ink Pad - Walnut Stain; Ink Applicator Tool;

I had the two mattes swap places, changed some of the tags, added the journal blocks, and added the small strips of rust from the kit remnants as well as stenciling the rust mattes.

Serengeti FFC Design Classic ALSB #6

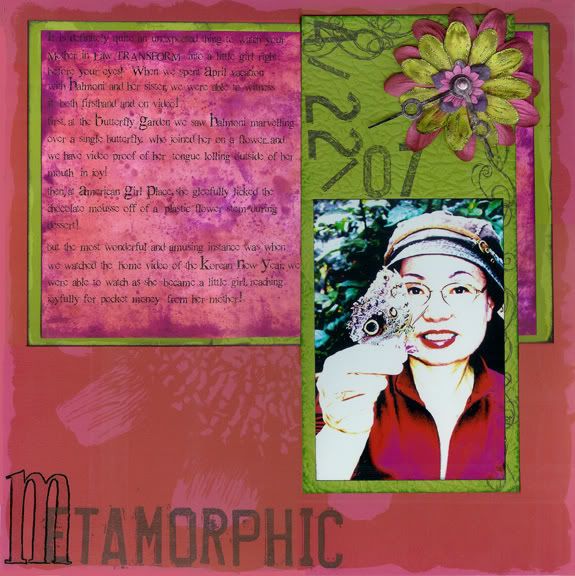
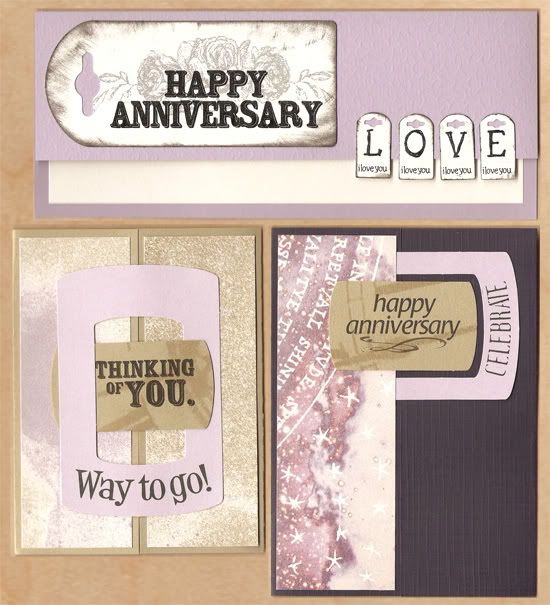
Club Scrap: Serengeti Crafter Classic 2008 - ALSB #6, Dark Green Plain, Dark Green Print, Coral Plain; Ivory Elegance 12/06 - Noble Alphabet Stencil;
Ranger: Adirondack Paint Dabber - Copper;
Scrapbook Takeout - Harvest Feast 10/07 - Fancy Pants True Rub-ons;

I rotated the layout, left off the journaling block, then added the title and rubons.

Serengeti FFC Design Classic ALSB #7

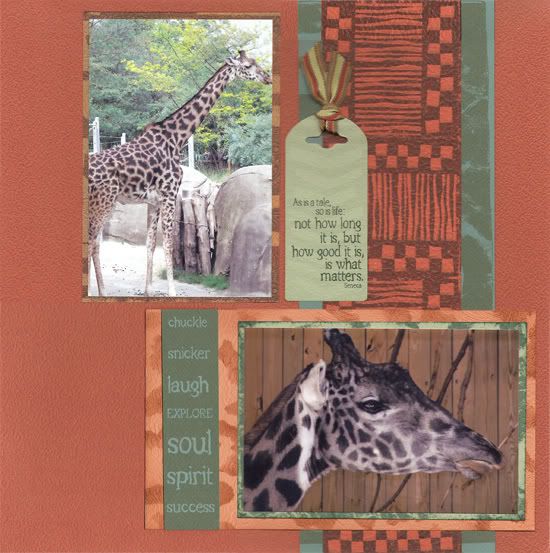
Club Scrap: Serengeti Crafter Classic 2008 - ALSB #7, Light Green Print, Rust Plain, Coral Plain, Coral Tag; Serengeti 11/07 - Border Stencil;
Ranger: Distress Ink Pad - Walnut Stain; Ink Applicator Tool;
Scrapbook Takeout - Celebrations 11/07 - Heidi Swapp Cargo Ribbon;

I left the word cutouts off, but added the tag, ribbon, small photo matte, and stenciling.

Serengeti FFC Design Classic ALSB #8

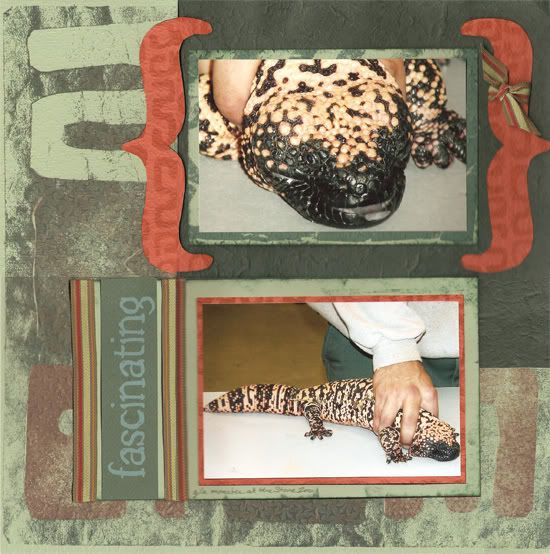
Club Scrap: Serengeti Crafter Classic 2008 - ALSB #8, Light Green Print, Light Green Print, Evergreen Handmade Plain, Rust Photo Matte, Rust Plain, Word Cutout; Serengeti 11/07 - Border Stencil;
Scrapbook Takeout - Celebrations 11/07 - Heidi Swapp Cargo Ribbon; Adventures in Altering 8/07 - Deluxe Designs Plain Janes brackets (as template);
Zig: Writer - Hunter Green;

I rotated the layout, added the ribbon, brackets, and stenciling, while also reducing the size of the rust photo matte to make room for the ribbons.

Serengeti FFC Design Classic ALSB #9

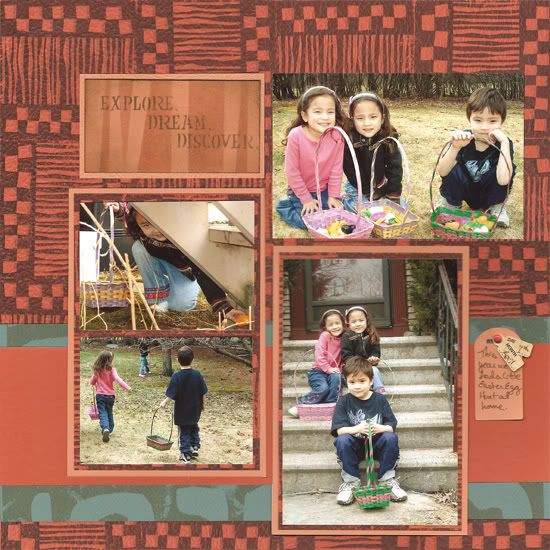
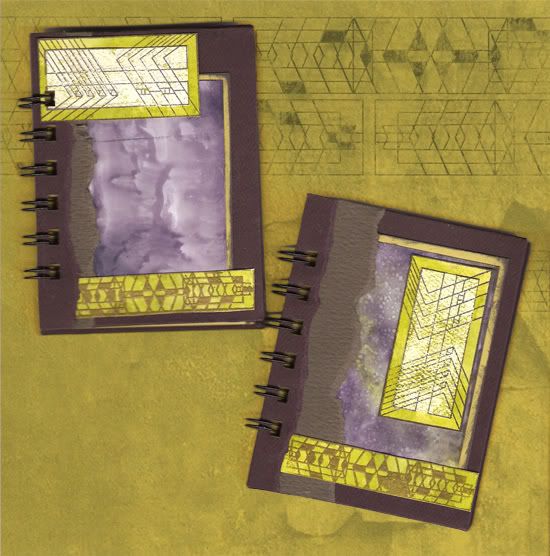
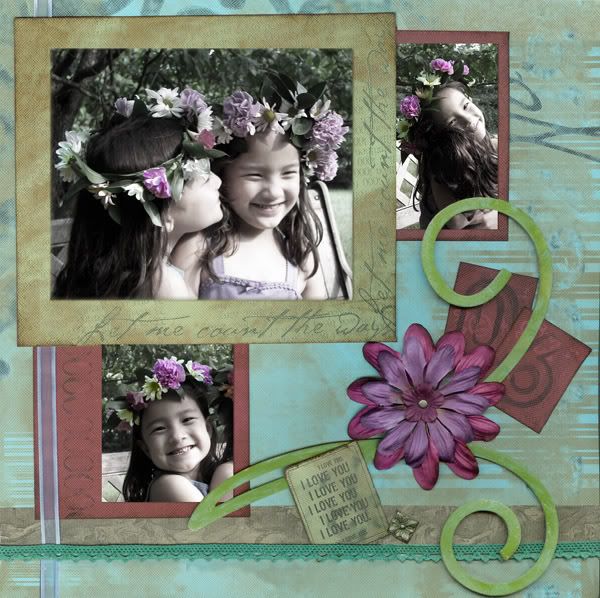
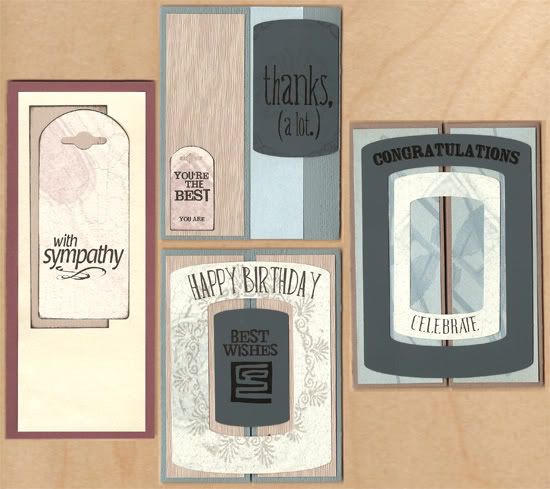
Club Scrap: Serengeti Crafter Classic 2008 - ALSB #9, Rust Print, Rust Plain, Dark Green Print, Coral Plain, Coral Tag; Great Outdoors 10/07 - CSt Bead Making Stencil; Stratosphere 4/07 - Stencil;
Ranger: Adirondack Ink Pad - Ginger; Distress Ink Pad - Walnut Stain;
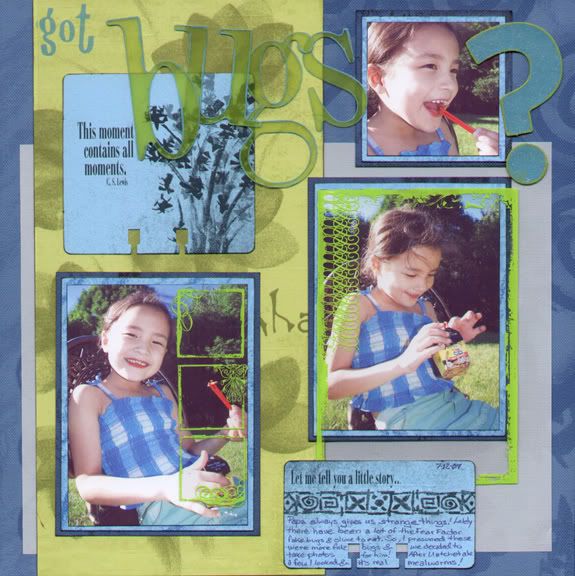
Scrapbook Takeout: Tell Your Story 3/08 - 7 Gypsies 97% Complete Stickers Notebook Cahier; Passion for Paisley 3/07 - American Crafts Elements Mini Brads #84874;
Zig: Memory Writer - Chocolate;

I rotated the layout, left off the word cutouts, added one more photo, brad, and the tags.

Serengeti FFC Design Classic ALSB #10

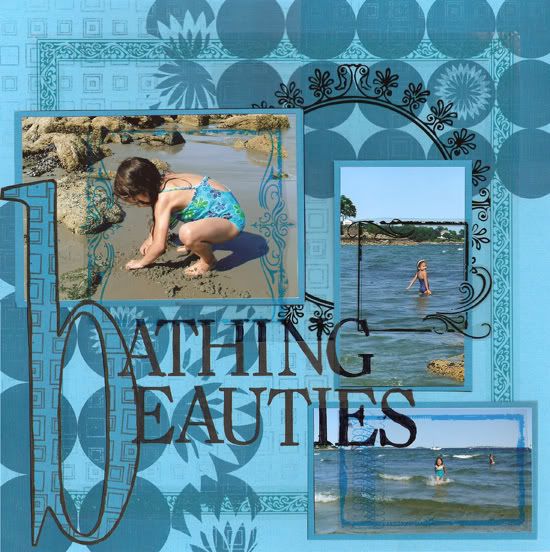
Club Scrap: Serengeti Crafter Classic 2008 - ALSB #10, Rust Plain, Rust Print, Dark Green Print, Coral 8.5x11 Print, Coral Plain, Light Green 8.5x11 Print, Light Green Tag, Word Cutouts; Safari 3/01 - Stencil;
Ranger: Adirondack Ink Pads - Bottle, Ginger;
Scrapbook Takeout - Celebrations 11/07 - Heidi Swapp Cargo Ribbon;

I simply added the stenciling and the ribbon as well as switching the word cutouts.

Serengeti FFC Design Classic ALSB #11

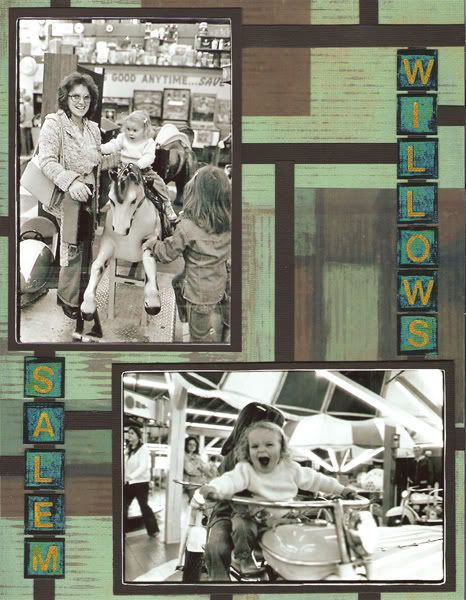
Club Scrap: Serengeti Crafter Classic 2008 - ALSB #11, Coral Print, Coral Plain, Brown Plain Rust Journal Block, Word Cutouts; Serengeti 11/07 - Border Stencil;
Ranger: Adirondack Ink Pad - Ginger;
Zig: Writer - Chocolate;

I switched the cutouts and journaling square, then added the remnant piece of brown and the stenciling.

Serengeti FFC Design Classic ALSB #12

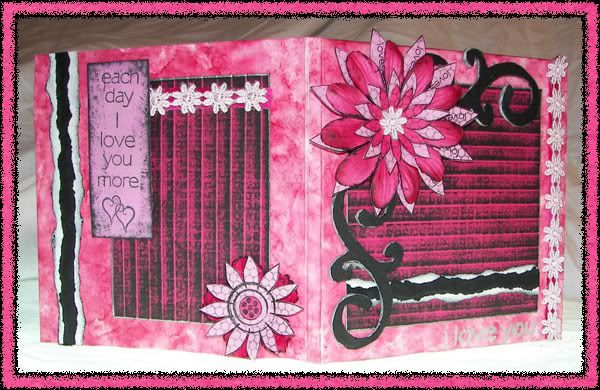
Club Scrap: Serengeti Crafter Classic 2008 - ALSB #12, Coral Plain, Coral 8.5x11 Print, Rust Plain, Word Cutouts, Rust Journaling Square; Stratosphere 4/07 - Stencil;
Zig: Writer - Chocolate;

I added the journaling square and stencil, then switched the word cutouts and cropped one matte.

Thursday, September 27, 2007

Frienship and Marriage: 1 DigiLayout and 1 Mini Book

I absolutely adore the September 2007 Club Scrap Be Still Kit... so many wonderful colors, shimmering papers, and gorgeous images... but it's been a very busy month with all of the back to school and scouting rushes as well as my week in Wisconsin for the Club Scrap Main Retreat (have to wait to share those creations until after their October Main Retreat, wouldn't want to spoil folks' surprises!), so I have not had much time to play! But I did create this layout for the DigiRap!

CS Be Still 9/07 DigiLayout by Neith Juch

This particular kit not only comes with 10 full color journaling boxes, but also a transparency of the journaling lines and box so that you can recreate them on any background papers! Here's the trick to using them... Adjust the "Leading" from your Text Tool until the text aligns properly with the journal box lines. In this instance, both my Freebooter Script and Milk & Cereal fonts worked perfectly at 32pt Leading!

Photoshop Elements 5.0 Text Tool Leading

I also wanted the photograph to be very soft while also standing out from the background. To do so, I went to Special Effects > Layer Styles > Inner Glow to add a pale soft pink glow within the edges of the photo. I then reinforced that very pale pink by Simplifying the layer and Stroking the edge of the photo with a pale pink border. And I made all of my shadows become a shade of the purple that I used in the layout elements.

To embellish the layout, I broke up the trio of transparency tiles to create three "Brushes" (the digital scrapper's version of a stamp). The pink and purple squares were simply brushed on in those colors while the yellow squares are the result of brushing onto the printed Lemongrass paper and cutting and pasting the tile onto my layout as a partially transparent layer!

Now, one little thing about the photo... it was taken in the same spot as my favorite photo from my wedding! My daughters had never been inside the home where I was married and we happened to be there earlier this month for a birthday party! They got to have a tour of all the "famous" sites from my wedding photos and took this shot almost as a recreation of one of ours... But, you know, those bright little girl swimsuits really made it informal, yet perfect for this layout!

Here's a mini album that I made my husband a few years ago for our Anniversary! There's one silly photo in the same room (a bathroom!) and another with my husband and his parents! (Yes, my daughters also were dying to go out on the balcony and Uatchet had me go downstairs where she promptly waved to me and announced "Hello, Citizens!")

Neith Juch's Wedding Mini Album Part 1 of 2

Neith Juch's Wedding Mini Album Part 1 of 2

This mini book is made in a Paper Reflections 3x3 Memory Book #MEM04460 Ivory Album and features only Club Scrap papers.

Supplies Used:
  • Cover - Anna Griffin Meaning of Flowers Clear Stamp Set; Offray Ivory Lace;
  • Entry Page - Club Scrap POPs, Time & Space Star White, Asian Artisan Cream Frost, Autumn Splendor Yellow Translucent; Club Scrap Poetic Unmounted Borders & Backgrounds Stamp; ColorBox Yellow Gold Mica Magic Ink Pad (visible in real life);
  • With Parents Layout - Club Scrap POPs, Time & Space Gold, Asian Artisan Cream Frost; Offray Ivory Lace; Europa Imports Ribbon #112/36F Color #8;
  • Awaiting Father of the Bride & Bride Layout - Club Scrap POPs, Time & Space Silver, Asian Artisan Blue Frost and Cream Frost;
  • Vows Page - Club Scrap Time & Space POP in Star White and Gold; PSX A-279 Corner Stamp; Ranger Clear Emboss it Ink Pad; Ranger Gold Super Fine Detail Embossing Powder;
  • Bouquet & Garter Layout - Club Scrap Time & Space POP in Gold and Autumn Splendor POP in Yellow Translucent; EK Success Laura Ashley LAIT003 Palace Garden Flower Stamp; Colorbox Bisque Fluid Chalk Ink Pad;
  • Dancing & Cake Layout - Club Scrap Asian Artisan POP in Cream Frost and Time & Space POP in Star White; Hero Arts #S1838 Florentine Scroll Background Stamp; Tsukineko Brilliance Moonlight White Ink Pad (visible in real life);

Tuesday, July 31, 2007

An Army Tribute: Gate Fold Flag Book

I have a bunch of these great little book kits hiding in a box! It's high time that I took them out of storage to start creating!

These dynamic books feature an overall Gate Fold design with Accordion Spines and Flag Pages. Check out the views from different angles, with the book fully opened up and flat, versus standing upright as a pair of 'trees." Plus, these great little books can hold SIXTY 2"x1.5" photos as well as one 5.5"x5.5" photo and a pair of 2.5"x5.5" photos on the inside covers! (I'm actually 10 photos short of a full book because I want to get a few more of my brother's Iraq photos and some with his medals on his uniform!)

Friendship 4/04 Closed Gate Fold Flag Book by Neith

Friendship 4/04 Open Gate Fold Flag Book by Neith

Friendship 4/04 Top View Gate Fold Flag Book by Neith

Friendship 4/04 Back Cover of Open Gate Fold Flag Book by Neith

The books that I have actually come in six different colors/patterns. The one that I've used is the Friendship 4/04 Kit, using a great textured marble cover and cream and khaki interior pages, just perfect for my brother's Army photos, eh?

Friendship 4/04 Gate Fold Flag Book Kit Asian Artisan 1/04 Gate Fold Flag Book Kit

To You With Love 2/04 Gate Fold Flag Book Kit Evergreen 12/03 Gate Fold Flag Book Kit

Poetic 9/03 Gate Fold Flag Book Kit Hearth & Home 10/03 Gate Fold Flag Book Kit

There is also an Asian Artisan 1/04 Kit featuring shimmering mint green asian floral prints on a semi-glossy cover with speckled grey and brown interior pages. The To You With Love 2/04 Kit has a great postmark/handwriting motif on a kraft cover with printed pink letters for the interior covers and plain pink flag pages. The Evergreen 12/03 version has luscious handmade plum paper covers with interior pages in a mix of handmade cream with embedded floral elements and cardstock in plum and cream with a crosshatch texture. The Poetic 9/03 kit has gorgeous vintage tin tile and feather motifs in monochromatic blue covers with blue interiors and white flags that feature colored feather prints. The Hearth & Home 10/03 book uses rich brick cardstock with a collaged cover that features at home words and architectural elements while also using some very light, nearly cream, brick flag pages.

Wednesday, June 13, 2007

Hawaiian Luau Invitations (4 Technique Junkies Techniques!)

I've been busy getting ready for the end of the school year and for my children's birthday parties! Here are the invites that we just made for the girls' Hawaiian Luau Party (thank you so much to Vernell for helping me finish them up today!)

Hawaiian Luau Invitations

These cards use a wonderfully dynamic structure based on Flap Fold Card from the Technique Junkies June/July 2007 Newsletter! The structure helped me by using small papers (didn't want to tear through all my nice 8.5x11 or 8.5x5.5 pieces for mass inviting!) including one 5x7, one 4x6, 1/3 of a 4x6, and 1/2 of a 3x5 POP from Club Scrap per card with a few spare scraps to make ATCs with!

Hawaiian Luau Invitations

For the ocean wave-like pattern, I used the Cling and Scrunch technique from the Technique Junkies June/July 2007 Newsletter, using the Color Washes and Club Scrap's glossy Asian Artisan 1/04 Blue Frost paper. For the Hibiscus square, I used the AquaPainted Rubber AND the Watercolor Crayon Painting techniques from Technique Junkies' Free Watercolor Crayon Tutorial samples along with the gorgeous Surf's Up! 7/06 CSt Hibiscus Collage WM Stamp. This stamp creates the blue, fabric-like, background and leaves the flowers as a negative image, perfect for painting in with other colors!

I would highly recommend joining Technique Junkies if you enjoy inking techniques! Every other month you receive a wonderful full color newsletter filled with different stamping and inking techniques. Online, as a subscriber, you can also access more step by step images and descriptions, a wealth of additional sample images, bonus online techniques, and accress to their yahoo group filled with plenty of tips, samples, challenges, and more! All for only $3 per issue with unlimited online access to those issues' web pages (you can only access the pages for the months where you've subscribed)!

Supplies Used:
  • Club Scrap: Surf's Up! 7/06 CSt Hibiscus Collage WM Stamp and Blue paper; Stratosphere 4/07 Light Blue paper; Farmer's Market 10/06 Blue Paper; Science 9/05 Sapphire Paper (to scan on top of); Textiles & Notions 9/04 Stewart Superior Palette Noir Black Ink Pad; Asian Artisan 1/04 Blue Frost paper; Evergreen Blue 12/03 paper; Polynesian 7/01 B&B UM Stamps; Party Pack 2006 UM Stamps; Niji Waterbrush;
  • Ranger: Adirondack Color Wash in Denim and Stream;
  • Staedtler: Karat Watercolor Crayons;
  • Technique Junkies: June/July 2007 Cling and Scrunch and Flap Fold Card; Online Free Watercolor Crayon Techniques;

Friday, February 23, 2007

Monoprinting: a great way to have bursts of color on your work!

Monoprinting with the Ranger Non Stick Craft SheetClub Scrap Painted Desert and Road Trip Kits

When I first was reading about this technique, with its proper name, it involved using specialized monoprinting sleeves... I improvised by using a pair of write on transparencies. But, I have since learned that it is soooo much easier to use the Ranger Non Stick Craft Sheet (which I already use every time I ink and glue)!

The ATC, in the right hand image above, was created with the transparencies, Club Scrap 3/05 Road Trip White Paper, Club Stamp 5/05 Painted Desert Unmounted Stamps, Ranger Black Pigment Ink & Black Embossing Powder (the edges of the ATC are inked and embossed also), and ColorBox Ancient Page Harbor, Lime, & Neptune Inks. I applied inks to the paper by dripping reinkers, one color onto the papers at a time, onto a transparency and used the ColorBox Stylus to spread it out, then sandwiched a blank transparency on it and pressed unevenly. I then spritzed the side of the transparency that I was using with the Ranger Perfect Ink Refresher and laid the cardstock onto the damp transparency. I sandwiched the transparencies again and used a brayer to press the ink into the paper. I then repeated the process with the darker ink.

Club Scrap 2/07 Refresh Club Stamp Kit
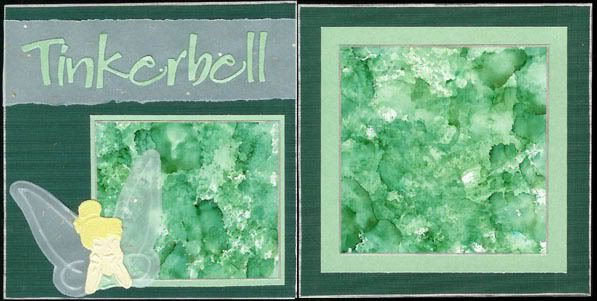
Basically you can press Ink Pads onto the craft sheet, drip and drizzle Reinkers on it, pounce ink on, smear glitter glue onto it, add Paints, drip or draw onto it with Alcohol Inks, dilute with Alcohol Blending Solution or even spritzes of water (for water based inks) and then take your intended project surface and press it onto the inks, swirl or swipe as you lift and marvel over the finished piece! You can also press portions of the Non Stick Craft Sheet onto itself before adding the inks to your project to get more of an ink blot effect! Glossy Paper is wonderful for this technique, but anything will do! The glossy surface just helps the ink travel and fills the paper better.

In the ATC to the right and in the title image for this Blog entry, I used a combination of Ranger Alcohol Inks in Lettuce & Stonewashed, Ranger Alcohol Blending Solution, and Ranger Stickles in Waterfall to create a backdrop for the stamped scratch marks, frame, and focal image. On the ATC, I used also Ranger's Aqua Adirondack Paint Dabber, Adirondack Bottle, Lettuce, & Stonewashed Ink Pads, and Archival Cobalt & Teal Ink Pads as well as Club Scrap's Glossy Paper plus the 2/07 Refresh Kit's CSt UM Stamps, CSt WM Statue & Fern Collage Stamp, Dark Blue, Light Blue, Dark Green, and Light Green Papers.

The mattes in the layout below were created with Glossy Paper and Alcohol Inks using a combination of monoprinting and direct pouncing with Alcohol Inks. I dry embossed Tinkerbell with a Plaid Embossing Stencil. The papers are all Club Scrap, using the Mint Frost and Cream Frost from the 1/04 Asian Artisan Kit, and unfortunately unlabelled other CS papers. (I didn't post details in the past!)

Club Scrap

Below is another sample made with alcohol ink monoprinting, as you can see in the upper right, eventually the colors will blend all the way, simply soak it up and add new inks! I misted rubbing alcohol onto the Glossy Paper and onto the craft mat, dripping Alcohol Inks at random. Then I laid the Glossy Paper face-down on the inked mat and swirled, swiped, and lifted. I used Club Scrap's 9/05 Science Unmounted Stamps, 7/05 Wings Apricot Paper, and Glossy Paper along with Ranger's Non Stick Craft Sheet, Adirondack Alcohol Inks in Butterscotch, Caramel, & Terra Cotta, and Adirondack Ink Pads in Butterscotch, Caramel, Rust, & Terra Cotta.

Club Scrap 9/05 Science Kit and 7/05 Wings Kit

Below is the new logo for my tutorials at Diversity Designs! I applied small "spatters" of Ranger's Alcohol Inks in Bottle, Lettuce, and Stream to the Ranger Non-Stick Craft Mat, added the Alcohol Ink Blending Solution, then took Glossy Paper and pressed it onto the sheet, swirling and lifting until the paper was well covered. I added more ink and targeted the white areas. After the paper was filled with ink, I added a little Adirondack Metallic Mixatives in Copper to a felt applicator and pounced away! The black art work is a self portrait of me that was then altered by Roselyn!

Ink Splatters Banner, Created With Alcohol Inks

Tim Holtz also teaches a version of this with his Distress Inks and calls it Wrinkle Free Distressing. With it, you will often spritz the craft sheet or your project material with water and then iron your finished piece to keep the wet work from warping. Ranger has posted one project with instructions for a Monoprint Card plus Distress Ink Tips. Pennywise Arts has a great online class on Monoprinting with Alcohol Inks.