Neith"s Crafty Creations - image created with Club Scrap DigiDeluxe Refresh and Serengeti Kits

Wednesday, May 30, 2007

Glue Free Handmade Books

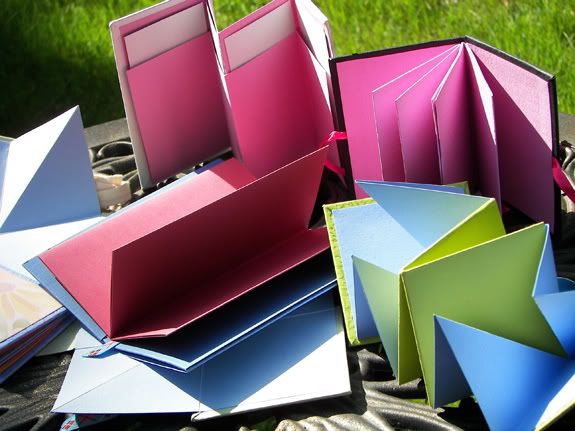
I am really loving these little books! They require a little bit of folding and a tiny bit of snipping... Then, voila! You have created a dynamic book which can contain all kinds of secret messages and images when you remove the components from one another! Or, you can use glue (gasp), and make the structure permanent!

Mini Books, Glue Free Handmade Book in Center

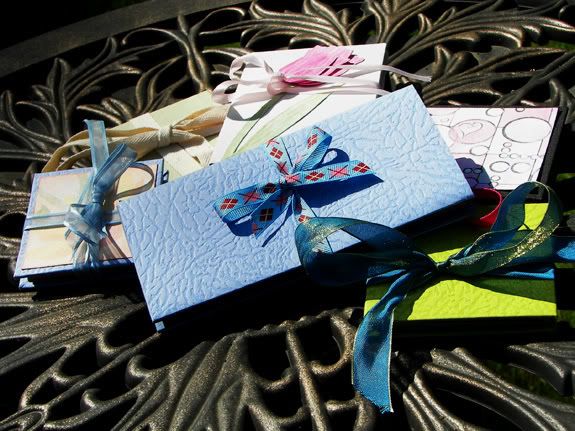
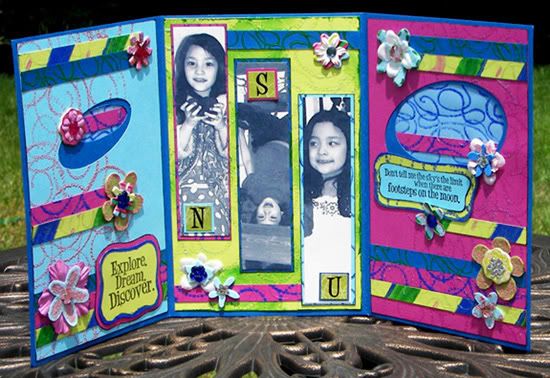
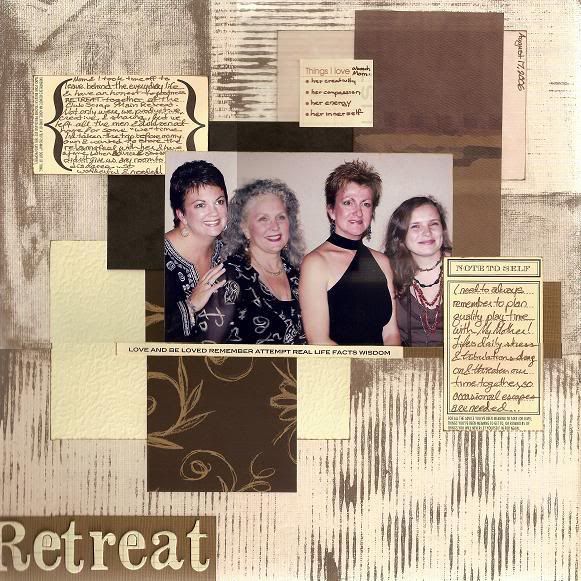
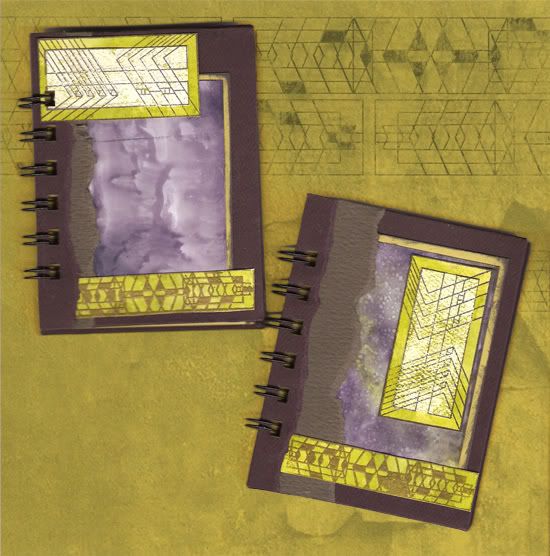
The images above and below feature an assortment of Handmade Mini Book projects that I have taught! Clockwise, from the center top book, they are the Fizz 1/07 Pocket Page Book, Fizz 1/07 Amazing Maze Book, Painted Desert 5/05 Squash/Explosion Book, Painted Desert 5/05 Glue Free Handmade Book, Painted Desert 5/05 & Nature's Wonders 5/06 Squash/Explosion Book, and the Mini Kit for a Cause Squash/Explosion Book!

Mini Books, Glue Free Handmade Book in Center

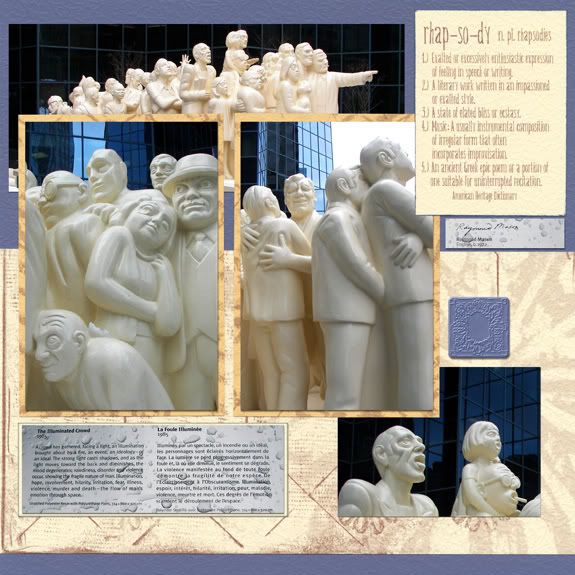
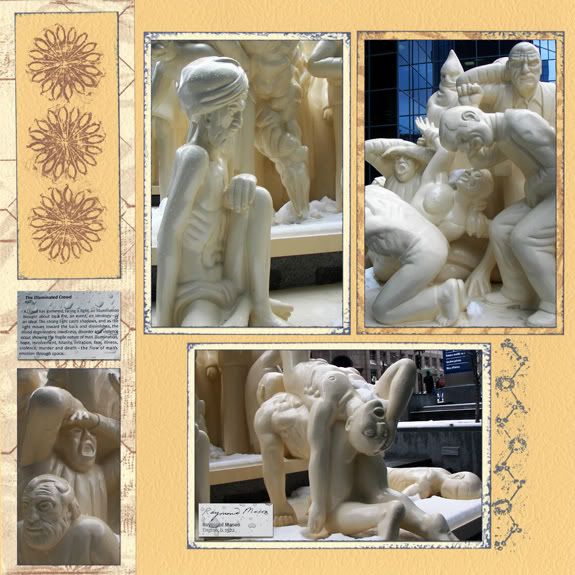
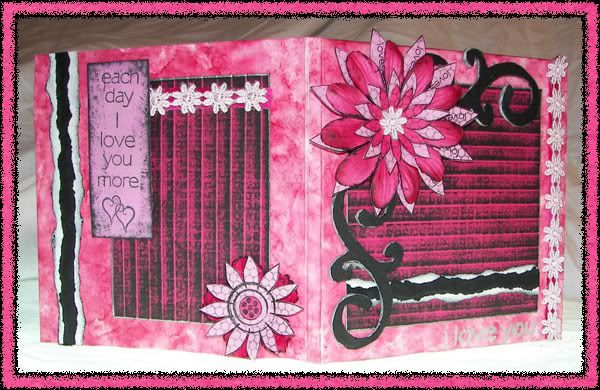
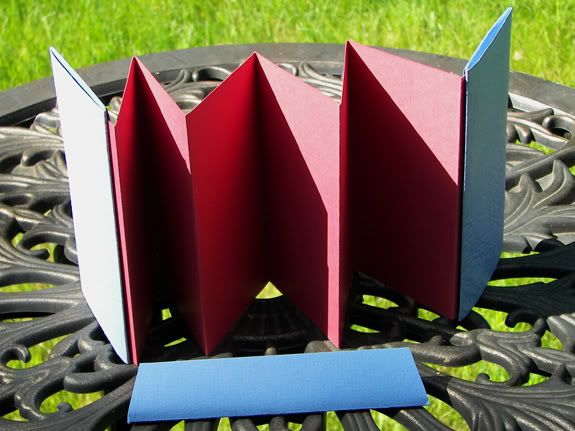
Below is a sample of the Glue Free Handmade Book with the spine removed... When all the parts are together, these "back" pages are concealed. What a wonderful way to add some hidden journaling and images, or to just surprise whomever you give it to!

Glue Free Handmade Book (open with spine removed)

Monday, May 28, 2007

Cherished Toys - Vintage Layout

I'm getting ready to get rid of a bunch of the kids toddler toys, including some that are very special to me! So, I did a fast little photoshoot this morning and here's the result!

Cherished Toys Layout


If you noticed, I edged EVERYTHING with the Van Dyke Brown Ink Pad... especially the Chipboard. There's nothing like turning a page and seeing the ugly side colors (although, sometimes I like that color to show)! I also altered my photo in Photoshop Elements with the Filters > Artistic > Cutout and then proceeded to etch an inside border into the printed photo with my Chizzel-It. I think it helped bring a more vintage feel to the photo of bright toys and helped it flow with the papers better. One other big tip, when you have heavy elements on your layout, use Crafter's Pick The Ultimate! glue. The hold is incredible, plus, one little bottle lasts so long!

Supplies Used:
  • Scrapbook Takeout - Passion for Paisley 3/7 American Crafts Downtown Orange Ribbon & Sadie Flower; Journal Jammers 4/7 Stamp;
  • Club Scrap - Rhapsody 3/7 Yellow Paper; Paisley 3/6 Burnt Orange Paper; LMCTW 2/7 Light Cherry Paper;
  • K&Co - Kazoo Kids Scrap Pad To Go; Words & Sayings Chipboard To Go;
  • Making Memories - Ribbon Charms Round #1;
  • Michael's - Value Ribbon;
  • Ranger - Van Dyke Brown Nick Bantock Ink Pad;
  • Provo Craft - Chizzel-it;
  • Crafter's Pick - The Ultimate! Glue

Explore Triptych Card

Oh my goodness, things have been BUSY around here! Please forgive me for my lack of recent posts! I'm going to try to make up for it!

Stratosphere 3/7 CSt Project - Cosmic Card Triptych


Club Scrap - Stratosphere 4/7 CSt Project Cosmic Card, CSt UM & WM Stamps, Art Nouveau Stamp, Jr Alpha Stickers, & papers in Dark Blue, Light Blue, Green, & Fuchsia; Textiles & Notions 9/4 Palette Ink Pad in Noir Black;

Scrapbook Takeout - Spring Fling 2/7 Prima Petal Poetry Flowers & Chipboard Buttons; Passion For Paisley 3/7 American Crafts Sadie & Annie Felt Flowers; Journal Jammer 4/7 Swirl Stamp; Wonderful Whimsy 6/7 Lil' Davis Designs Sky Paint;

Lil' Davis Designs Acrylic Paints in Bubblegum, Huckleberry, & Pistachio; Asst Rhinestones; Fun Foam; Silk Flower;

Inspired, thanks to Ann, by Elsie's 52 Scrapbooking Challenges Book... by a whole slew of them!

Unfortunately, the Sky Paint doesn't show well in the photo, but it has a neat effect, almost like clear embossing! I did smear a green paint fingerprint on the center piece and decided to run with it and just fingerpaint in some of the swirls for a more interesting background! I also hand painted and paint-stamped 3 pieces of cardstock that I cut into strips for the pages. And.. of course I loaded up the felt flowers with painted doodles!

The back of the piece has solid panels, flanked with border strips, where the kids will each list things that they are thankful for from their father... he has that sense of adventure and I want them to write about it so that we can give this to him for father's day!

Wednesday, May 16, 2007

Collections Beaded Necklace & DigiLayout

Something hit me when I saw Christine Strube's Southwest Bohemian Necklace in the June/July 2007 Beadwork Magazine and I just knew that I had to use the base design to create my own necklace! I changed things around a bit in order to make it work with my Club Scrap Collections June 2006 Beads, whipped it together while the kids were at school, and love the end result!

Club Scrap Collections June 2006 Beaded Necklace and DigiLayout by Neith

All beads are from Club Scrap Collections June 2006 Kit, with the addition of some simple seed beads and findings from Blue Moon Beads. All digital layout components are from the same month's Club Scrap DigiGoodies Kit along with Landsdowne font and Photoshop Elements effects including Inner Ridge Bevels, Drop Shadows, Outer Glows, and Strokes. Some hues have been altered to coordinate better with the photo and elements have been stretched!

Monday, May 7, 2007

Assembly Line Scrapbooking (ALSB)

Each and every month, for 10 months now, Club Scrap has provided amazing Assembly Line Scrapbooking (ALSB) instructions which allow you to take an entire kit worth of product and whip together a slew of layouts using up nearly each and every inch of paper! Since March, these have been provided for FREE to all members! And Club Scrap DigiDeluxe and DigiLayouts kits come with complete digital versions of these layouts!

Below is a new layout I created by slightly adapting an ALSB design from this month's May 2007 Simply Beautiful Kit! Read more about it at the bottom of this post!

Simply Beautiful May 2007 ALSB Layout by Neith


Please check out these other posts which include more ALSB Layouts which I've added photos to! I promise to share more soon!


Supplies Used on the Above Layout:
  • Club Scrap - Simply Beautiful May 2007 Green Sr 12x12 Print, Lilac & Tan Plain Papers, Tan Printed Perforated Squares, Bead and Embellishment Packs Beads & Mini Brads, Fibers, Waxed Linen Thread, and Simply Fascinating Floral Stencil;
  • Ranger - Adirondack Ink Pads in Lemonade and Willow; Cut 'n' Dry Nib; Distress Ink Pad in Brushed Corduroy;
  • Zig Memory Writer in Chocolate;
  • Colorbox Stylus Tool with Sponge Tips;

I desaturated my very bright May Day photos in order to have them flow better on the antiqued paper designs! I also mildly changed dimensions and merged two mattes into one, adding strung beads, journaling, and stenciling flowers onto the large lilac matte. You are ALWAYS able to adapt these great designs to better suit your style and photos!

Saturday, May 5, 2007

Metamorphic Layout

This photo is actually a macro of the butterfly, with my mother in law all blurred out behind it... but the second before it went off, I had a little video of her floating the flower around in the air and her little tongue dropping down while she watched it! So the memory is so special to us... especially because, during the week together, we had a number of other moments where we could see the little girl within her!

So, what's a girl to do with a blurry photo? (Especially when your Mother in Law is without her makeup and may not want that photo posted for the world to see?) Why, alter it in Photoshop Elements, of course! I adjusted the Hue/Saturation and Sharpened it until I was content and the image was popping!

Metamorphic Layout by Neith


To create the title, I stamped with the Fossils Font, and then stamped the "m" from Big & Tall at the start, with some overlap, in Watermelon and Wild Plum. I then traced around it with the Gelly Roll Pen, creating a great raised outline.

On the flower, I inked the green Prima with my Peeled Paint Distress Ink Pad, Direct to Paper (DTP) then added a spritz of water and more ink. After it dried I outlined it with the Stickles. I covered the Ivory Elegance clock hands with the Silver Leafing Pen and then took my Alcohol Ink Applicator and added the alcohol inks and more silver before pouncing over the clock hands and the small white silk flower. I also covered the purple Wheel & Sprocket brad with the Silver Leafing Pen and a little Wild Plum Alcohol Ink.

For the journaling, I took out my Non Stick Craft Mat and pressed all of the pink-red inks onto it in various spots, spritzed with water, and pressed the mat onto itself to create tiny beads of watered ink all over the Mat with each color randomly dotted across the entire surface. Then I took a sheet of plain glossy white paper and pressed it onto the ink, then pressed again while swirling. I wet the entire paper a moment later and used DTP to cover it with Worn Lipstick Distress Ink before distressing the edges, DTP with Wild Plum Adirondack Ink. When it dried, I simply printed on it with my printer, then manually added punctuation with my Cut 'n' Dry Nib and a little Pebble Adirondack Ink... because, unfortunately the free font comes with NO punctuation!

Here is the actual journalling!
It is definitely quite an unexpected thing to watch your Mother in Law TRANSFORM into a little girl right before your eyes! When we spent April vacation with Halmoni and her sister, we were able to witness it both firsthand and on video!

First, at the Butterfly Garden we saw Halmoni marvelling over a single butterfly, who joined her on a flower... and we have video proof of her tongue lolling outside of her mouth in joy!

Then, at American Girl Place, she gleefully licked the chocolate mousse off of a plastic flower stem during dessert!

But the most wonderful and amusing instance was when we watched the home video of the Korean New Year. We were able to watch as she became a little girl, reaching joyfully for pocket money from her mother!
Supplies Used:
  • Club Scrap - Fossils 8/04 UM Stamps; Textiles & Notions 9/04 Palette Noir Black Ink Pad; Painted Desert 5/05 Flower Print, Stem Print, and Stem Embossed Plain Papers; Big & Tall 2005 Lowercase UM Stamps; Ivory Elegance 12/06 B&B and CSt UM Stamps plus Embellishment and Bead Assortment;
  • Scrapbook Takeout: 2/07 Kit Prima Petal Poetry;
  • Ranger - Adirondack Alcohol Ink in Pitch Black & Wild Plum; Adirondack Alcohol Ink Applicator; Adirondack Ink Pads in Pebble, Raspberry, Watermelon, & Wild Plum; Cut 'n' Dry Nib; Distress Inks in Fired Brick, Peeled Paint, and Worn Lipstick; Nick Bantock Ink Pad in Chartreuse; Non Stick Craft Mat;
  • Krylon - Leafing Pen;
  • Sakura - Gelly Roll Pen;
  • Photoshop Elements;
  • Genius of Crack PC Font;
  • Glossy Paper; Silk Flower;

Retreat Layout: Celebration of Womanhood Weekend

I'll have to tell you all more about this layout a little later and replace it with a smoother scan! (Away from home and without my regular software/scanner or sleep at 1AM!) But I wanted to quickly share a layout that I did tonite as part of my Celebration of Womanhood Weekend Banquet!

I handed out a sheet to my students (a wee, small class, but I have a few raindates for it!) that were aimed at helping you write about an important woman in your life... a bond with them, emotions, or even to document their life. Here's my little contribution! A page about my mother and I escaping the everyday life and running off to the Club Scrap Main Retreat together last year! (Much more to come about that later!)

Retreat Layout by Neith, mixed Club Scrap Kits and Scrapbook Takeout April 2007 Kit

Club Scrap: Color In Black and White 4/06 Land Print; 3/07 Rhapsody Cream; Ivory Elegance 12/06 Dark Brown Print & Light Brown Plain; Collections 6/06 Saddle Brown Print; Science 9/05 Ebony Plain; Chocolate Shoppe 2/05 Ivory Press;

Scrapbook Takeout 4/07 Kit: Heidi Swapp Newsprint Ledger Chipboard Alpha; 7 Gypsies 97% Complete Tags Parenthesis and Note to Self; 7 Gypsies 97% Complete Document Stickers;

Ranger Archival Coffee Ink Pad; Zig Brown Memory Writer;

Inspired by Francine's "Finding My Groove" Layout

Wednesday, May 2, 2007

4 DigiLayouts for you! Sightseeing in Montreal and Wisconsin!

I wanted to share a few digital layouts from our school vacation trip... (I'll be scrapping more photos from it soon, I promise!) And also an older photo from a park near the Club Scrap Main Retreat in August 2006!

Illuminated Crowd by Raymond Mason, 1985, Montreal


A few blocks from our hotel, while evading the slush and rain, we happened upon this wonderful sculpture on the way to the Metro! The kids were immediately awed, but I had to risk being left behind while my husband rushed into the "comfort" of the underground! Amazingly enough, this sort of grasped the concept of the work!

Illuminated Crowd - Rhapsody DigiLayout by Neith

Raymond Mason installed this piece in 1985, to represent a rather mixed crowd. Most of the people at the front end are engrossed by something in front of them... they are naturally lit up by the sunlight and many have a glow on their faces. However, as you move backwards through the crowd, those who cannot see this spectacle and are locked in their own world... some are miserable, some are happy, others are causing pain and anguish for their fellow man.

Illuminated Crowd - Rhapsody DigiLayout by Neith

To create these layouts, I used the Club Scrap DigiDeluxe Rhapsody March 2007 Kit, including Layout #18, Layout #17, Xtra #8, and the inked edges from Layout #17 to create a brush, edging the photos in that layout with the ink. I also added simple drop shadows and layered a few more photos into it, how could I resist?

The One Tonne Experiment - Stratosphere DigiLayout by Neith

The same day that we saw the sculpture, we visited the Montreal Biosphere! We thought it could just be a half-day visit, before seeing another museum, but as soon as they did their first activity, they were hooked! Sebek had already been proclaiming war on Global Warning to his grandfather that morning... and then, we were able to do an experiment which really brought things home to the kids!

For this layout, I used the Club Scrap DigiGoodies Stratosphere April 2007 Kit, including the Dark Blue, Green, and Fuchsia Prints, Fiber #1, Tag #5, and Xtras #24 & 40. I also used drop shadows and the Desigers Bold free font! This layout appeared in the DigiRap (monthly newsletter) along with everyone's copy of the Stratosphere 4/07 Digital Kits!

Zetetic - Rhapsody DigiMug Layout by Neith

Zetetic means proceeding by inquiry; a search of investigation... This Neenah, WI water sculpture certainly personifies the word in my mind! I decided that it deserved to become a mug and created this digital layout for one of my personalized tumblers!

I used the Club Scrap DigiGoodies Rhapsody March 2007 Kit, including the Sr Rust and Cream Prints, Jr Yellow Print, and the plain Blue Paper (hue altered to become a green), the beveled alphabet, Xtra #2, snippets of Transparency #5, and the versatile Torn Paper Tool! I also warped elements, altered hues, and added drop shadows. This layout appeared in the DigiRap along with everyone's Rhapsody 3/07 Digital Kits!