Neith"s Crafty Creations - image created with Club Scrap DigiDeluxe Refresh and Serengeti Kits
Showing posts with label Kit: 2005/05 Painted Desert. Show all posts

Monday, June 9, 2008

Body & Soul: 1 Card plus 2 Digital Layouts

I have such a pile building up of pages that I need to scan and add here, but today I'll go with some that are already on my computer ;) Both of the layouts were made using the Body & Soul 5/08 Club Scrap Digital Kit and the card was made by using the digital transparency images on my photograph before printing and matting it!

Duckling Photograph by Audrey Schiller, DigiLayout by Neith Juch

Photography by Audrey Schiller
Club Scrap: Body & Soul 5/08 Digital Kit - DP04, DP07, DP10, Exp02, Tag07, Tran08, Tran13, Trans21, Xtra06, Xtra29;

I created my own custom background/printed matte in Photoshop Elements by using Filter >> Texture >> Grain >> Stippled and then by layering the kit's papers and transparencies with various blending modes and deleted areas of the photo until I was happy with the results.

As soon as I saw my friend's photos of the baby ducklings in her neighborhood, I knew I had to use them with this kit! You can see more of her work at her new photography blog! http://audreysunfocused.blogspot.com/

Sparkle: Body and Soul DigiLayout by Neith

Club Scrap: Body & Soul 5/08 Digital Kit - DP04, Tran08, Tran14; Sparkle 12/07 Digital Kit - Tran22, Xtra54;
Adobe Photoshop Elements 5.0: Blending Modes - Multiply, Screen; Artistic Filters - Film Grain, Smudge Stick; Render Filter - Lens Flare;

For our very first sparkler experience, of course my camera was not ready and when I got it out I kept having to dodge the 7 kids to get a photo... winding up with just one unobscured shot, but it was blurry! What's a gal to do but mess around with the photo digitally?

Take Time Card by Neith Juch

Club Scrap: Body & Soul 5/08 Digital Kit - Transparencies; Painted Desert 5/06 Flower Embossed Plain Paper, Sand Plain Paper;
Stewart Superior: Palette Ink Pad - Noir Black;
Adobe Photoshop: Layer Effects - Soft Glow;

Printing text/images as part of your printed photograph can be a wonderful way to make a photographic card and add a sentiment... It's also very handy if you want to produce a lot of the same card, or just want the text to show up! You can always create a contrasting colored layer of the text under it then enlarge and soften it, add drop shadows, or add a soft glow so that it will be legible even on high contrast photos!

Sunday, May 4, 2008

Ink Your Clay Tutorial

The site where I used to have this tutorial recently went down... So I hunted to find my copy of the original to post here for you! I hope you enjoy!

Ink is for more than just paper and altered arts. Did you know that you can also use your inks to create custom colored polymer clay?
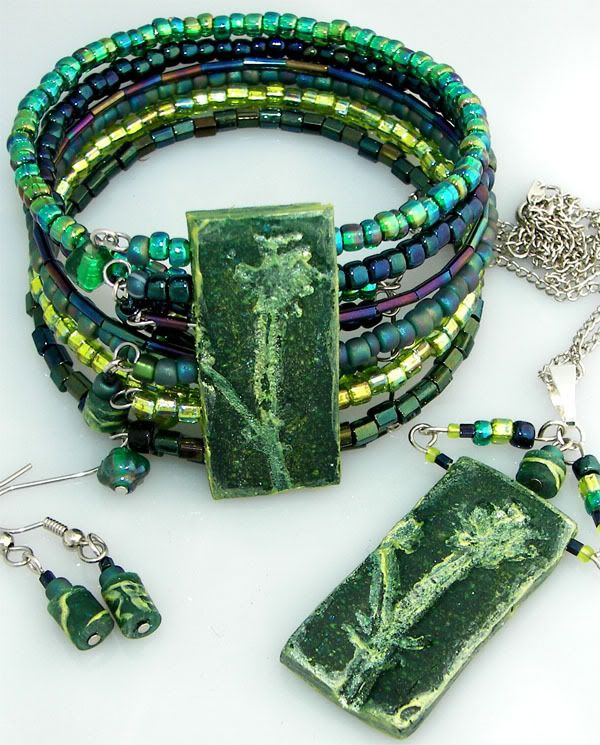
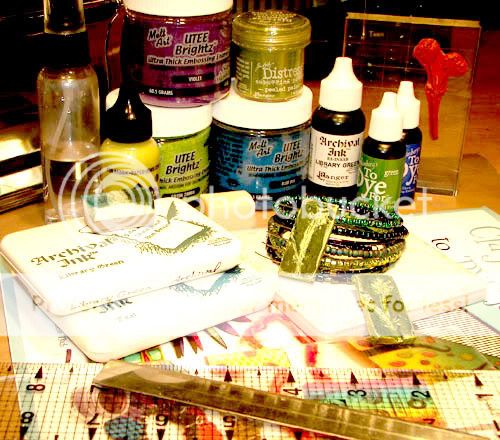
Design Originals has a great book, Clay Techniques to "DYE" for, which teaches you all kinds of ways to use Ranger inks and embossing powders to color your clay, along with over 20 projects. I took inspiration from their coloring techniques to create my own clay blend… which I then used to create a series of tube beads, a pendant, and a six-holed focal spacing bead for a bracelet modeled after Heather Powers Cuff Bracelet from Bead & Button: Beading Basics Essential Techniques and https://www.humblebeads.com/blog/throw-back-thursday-bead-edition
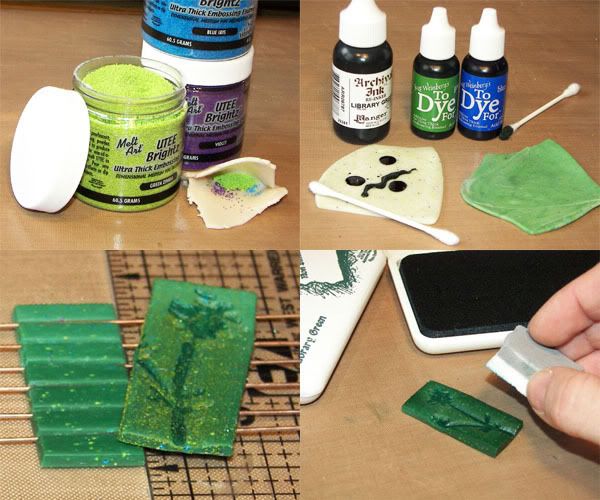
UTEE is wonderful for tinting your clay to a small degree while embedding grit and variability into the piece. Translucent clay will allow the differing levels of color shine through. To tint clay with UTEE, first condition your clay by running it through your clay machine at the thickest setting until it is pliable. Pinch your clay into a pocket and add no more than 2 teaspoons per full bar of clay. Seal the pocket and run it through your clay machine, folding between each run, until the UTEE is evenly dispersed.
Even with UTEE Brightz, the clay will still be light in color when you cure it. So, at this point, you may wish to add dyes to the clay to give it a deeper color. Be sure to put on some gloves for this part because the liquid ink can get messy! Take your conditioned clay and add some drops of Archival Reinkers or To Dye For to the surface of your sheet. Spread it out with a Q-Tip and fold the clay over, keeping the inked surface covered. Run it through the clay machine, at the thickest setting, folding between runs until the color is even.
You may opt to create a faded sheet of clay by merging two colors, or go with just one. Mold your clay as you wish and then you can also color the surface of your piece by stamping on it, pressing additional embossing powders into it, using Adirondack Pigment Pens and Adirondack Dimensional Pearls paints, using Cut n' Dry Foam to apply more Archival Ink, etc. If you have too much clay left over, you may save it or use it to make a series of small beads. Cure according to the instructions on your clay package and marvel over your finished work!
One wonderful thing about using your inks, powders, and stamps to create clay pieces is that you can create gift cards or scrapbook pages with the same materials for a wonderfully coordinating set!
Supplies used on jewelry pieces:
  • Amaco: Bead Baking Rack; Bead Making Tool Set; Polymer Clay & Craft Oven;
  • Bead & Button: Beading Basics Essential Techniques;
  • Beadalon: 10mm Silver Plated Medium Bale;
  • Blue Moon: Memory Wire Bracelets;
  • Club Scrap: 2/07 Refresh Beads; 8/06 Wheel & Sprocket Beads; 1/06 Framed Beads; 5/03 Aromatherapy Borders & Backgrounds Unmounted Stamps;
  • Darice: 2" Nickel Plated Head Pins;
  • Design Originals: Clay Techniques to DYE for;
  • Fire Mountain Gems: 4.5mm Silver Plated Jump Ring; Surgical Steel Fish Hook Ball/Coil Earwire;
  • Ranger: Adirondack Dimensional Pearls in Lettuce; Archival Ink Pads in Library Green & Teal; Archival Reinker in Library Green; Cut n' Dry Foam; Distress Embossing Powder in Peeled Paint; To DYE For in Blue & Green; UTEE Brightz in Blue Iris, Green Zinnia, & Violet;
  • Sculpey: Translucent Polymer Clay;

Supplies used on card:
  • Club Scrap: 2/07 Refresh Dark Green & Light Green plus Water Mister; 10/06 Farmer's Market Green; 5/06 Painted Desert Stem; 3/04 Culinary Green; 5/03 Aromatherapy Borders & Backgrounds Unmounted Stamps;
  • Krylon: Silver Leafing Pen;
  • Ranger: Adirondack Alcohol Ink Metallic Mixatives in Silver; Adirondack Dimensional Pearls in Lettuce; Archival Ink Pads in Library Green & Teal; Cut n' Dry Foam; Distress Ink Pads in Peeled Paint & Shabby Shutters;

Wednesday, May 30, 2007

Glue Free Handmade Books

I am really loving these little books! They require a little bit of folding and a tiny bit of snipping... Then, voila! You have created a dynamic book which can contain all kinds of secret messages and images when you remove the components from one another! Or, you can use glue (gasp), and make the structure permanent!

Mini Books, Glue Free Handmade Book in Center

The images above and below feature an assortment of Handmade Mini Book projects that I have taught! Clockwise, from the center top book, they are the Fizz 1/07 Pocket Page Book, Fizz 1/07 Amazing Maze Book, Painted Desert 5/05 Squash/Explosion Book, Painted Desert 5/05 Glue Free Handmade Book, Painted Desert 5/05 & Nature's Wonders 5/06 Squash/Explosion Book, and the Mini Kit for a Cause Squash/Explosion Book!

Mini Books, Glue Free Handmade Book in Center

Below is a sample of the Glue Free Handmade Book with the spine removed... When all the parts are together, these "back" pages are concealed. What a wonderful way to add some hidden journaling and images, or to just surprise whomever you give it to!

Glue Free Handmade Book (open with spine removed)

Saturday, May 5, 2007

Metamorphic Layout

This photo is actually a macro of the butterfly, with my mother in law all blurred out behind it... but the second before it went off, I had a little video of her floating the flower around in the air and her little tongue dropping down while she watched it! So the memory is so special to us... especially because, during the week together, we had a number of other moments where we could see the little girl within her!

So, what's a girl to do with a blurry photo? (Especially when your Mother in Law is without her makeup and may not want that photo posted for the world to see?) Why, alter it in Photoshop Elements, of course! I adjusted the Hue/Saturation and Sharpened it until I was content and the image was popping!

Metamorphic Layout by Neith


To create the title, I stamped with the Fossils Font, and then stamped the "m" from Big & Tall at the start, with some overlap, in Watermelon and Wild Plum. I then traced around it with the Gelly Roll Pen, creating a great raised outline.

On the flower, I inked the green Prima with my Peeled Paint Distress Ink Pad, Direct to Paper (DTP) then added a spritz of water and more ink. After it dried I outlined it with the Stickles. I covered the Ivory Elegance clock hands with the Silver Leafing Pen and then took my Alcohol Ink Applicator and added the alcohol inks and more silver before pouncing over the clock hands and the small white silk flower. I also covered the purple Wheel & Sprocket brad with the Silver Leafing Pen and a little Wild Plum Alcohol Ink.

For the journaling, I took out my Non Stick Craft Mat and pressed all of the pink-red inks onto it in various spots, spritzed with water, and pressed the mat onto itself to create tiny beads of watered ink all over the Mat with each color randomly dotted across the entire surface. Then I took a sheet of plain glossy white paper and pressed it onto the ink, then pressed again while swirling. I wet the entire paper a moment later and used DTP to cover it with Worn Lipstick Distress Ink before distressing the edges, DTP with Wild Plum Adirondack Ink. When it dried, I simply printed on it with my printer, then manually added punctuation with my Cut 'n' Dry Nib and a little Pebble Adirondack Ink... because, unfortunately the free font comes with NO punctuation!

Here is the actual journalling!
It is definitely quite an unexpected thing to watch your Mother in Law TRANSFORM into a little girl right before your eyes! When we spent April vacation with Halmoni and her sister, we were able to witness it both firsthand and on video!

First, at the Butterfly Garden we saw Halmoni marvelling over a single butterfly, who joined her on a flower... and we have video proof of her tongue lolling outside of her mouth in joy!

Then, at American Girl Place, she gleefully licked the chocolate mousse off of a plastic flower stem during dessert!

But the most wonderful and amusing instance was when we watched the home video of the Korean New Year. We were able to watch as she became a little girl, reaching joyfully for pocket money from her mother!
Supplies Used:
  • Club Scrap - Fossils 8/04 UM Stamps; Textiles & Notions 9/04 Palette Noir Black Ink Pad; Painted Desert 5/05 Flower Print, Stem Print, and Stem Embossed Plain Papers; Big & Tall 2005 Lowercase UM Stamps; Ivory Elegance 12/06 B&B and CSt UM Stamps plus Embellishment and Bead Assortment;
  • Scrapbook Takeout: 2/07 Kit Prima Petal Poetry;
  • Ranger - Adirondack Alcohol Ink in Pitch Black & Wild Plum; Adirondack Alcohol Ink Applicator; Adirondack Ink Pads in Pebble, Raspberry, Watermelon, & Wild Plum; Cut 'n' Dry Nib; Distress Inks in Fired Brick, Peeled Paint, and Worn Lipstick; Nick Bantock Ink Pad in Chartreuse; Non Stick Craft Mat;
  • Krylon - Leafing Pen;
  • Sakura - Gelly Roll Pen;
  • Photoshop Elements;
  • Genius of Crack PC Font;
  • Glossy Paper; Silk Flower;

Thursday, April 5, 2007

Mini Book: What We Remember From Childhood...

My seven and a half year old daughters are always very excited to get to make their own books! They've actually made 12 of the Pocket-Page Books in the past year and a half! And I've taught a number of their classmates to make the Squash Books... so there's nothing stopping you!

Club Scrap Easter Maze Book by Neith


I do really love the quote on this book's cover! It seemed perfect for a little book of photos from last year's Easter Egg Hunt! It was a special memory because my cousin's sons really came out of their shells to play with my children and interact with the grownups! The older brother's always been quite shy, so you can imagine how special it made things!

Club Scrap Easter Maze Book by NeithClub Scrap Easter Maze Book by Neith


I used a single sheet of Club Scrap Surf's Up! 7/06 Plain Blue 12x12 Paper to fold and cut into there twelve 4"x3" pages, using a Maze Book design. I also used the Refresh 2/07 Dark Blue and Fizz 1/07 White Translucent Papers, Ivory Elegance 12/06 Borders & Backgrounds UM Stamps, Farmer's Market 10/06Painted Desert 5/05 Stencil, CS Bookbinding, Padding, & Laminating Adhesive, Ranger Adirondack Ink Pad in Denim, Ranger Adirondack Acrylic Paint Dabber in Aqua, Ranger Stickles in Waterfall, Clearsnap Ice Blue Fluid Chalk Ink, Fiskar's Victorian Edge Rotary Trimmer, and Michael's Ribbon.

Club Scrap Easter Maze Book by NeithClub Scrap Easter Maze Book by Neith

Club Scrap Easter Maze Book by NeithClub Scrap Easter Maze Book by Neith


Below are two other book designs! A Mini Squash/Explosion Book and a Pocket-Page Book!

Club Scrap Fizz Tulip Mini BookClub Scrap Fizz Tulip Mini BookClub Scrap Nature's Wonders and Painted Desert Mini Squash Book
Club Scrap Nature's Wonders and Painted Desert Mini Squash Book


Tuesday, March 20, 2007

When Chipboard & Paints Come Out to Play!

Something got into me this weekend! I had some great new paisley chipboard pieces, felt flowers, and ribbon from Scrapbook Takeout's newest Passion for Paisley March Kit plus a renewed desire to scrap with Club Scrap's Paisley paper after last weekend's banquet... and then a few of the great Ranger Adirondack Dabbers with their seals still in place?!? AND Scrapbook Takeout was holding a Cyber Crop, complete with fun challenges like using NO patterned papers and using a mishmash "Alphabet Soup" for a page title... What else was a girl to do but scrap!


Paisley Summer by Neith

Supplies Used:
  • Club Scrap: Refresh 3/7 Beads; Color in Black & White 4/6 Copper Paper; Paisley 3/6 Coral & Burnt Orange Paper and Overlay Stencil; Painted Desert 5/5 Sand Paper; Let Me Count The Ways 2/6 Aqua Paper;
  • Scrapbook Takeout: Passion for Paisley 3/7 Kit's Fancy Pants Big Board Chipboard in Paisley, American Craft Sadie & Annie Felt Flowers, American Crafts Downtown Orange Ribbon;
  • Ranger: Frosted Crystal Antiquities Pad; Raisin Adirondack Pad; Lettuce, Aqua, & Copper Adirondack Acrylic Paint Dabbers;
  • Additional: JoAnn Metallic Mini Brads in Copper; Beadery Elements Hemp Jewelry Cord #2774H; Nicole's Metal "S", Making Memories Alpha Charms; EK Success Alpha Brads; Maya Road Dingbat Chipboard;
Techniques Used:
  • I masked off half of the paper and used Direct-To-Paper (DTP) to white wash the bottom 2/3 with the Ranger Frosted Crystal Antiquities Ink Pad. Then I used the Aqua Dabber to stencil the paisley motifs onto the same area.
  • I also used DTP to tint more of the Paisley paper with Ranger Raisin Adirondack Ink Pad.
  • I painted the chipboard and metal letters with the Ranger Dabbers, sanding the "S" free of paint. Also, I used a paintbrush and the opposite end of the paintbrush to dot and outline the flowers, frame, and paisley images as well as circular pieces of scrap paper.
  • I traced the chipboard to cut the cover papers with, then cut slightly smaller than the tracing... off-centering the large paisley motif one!

Sunday, March 18, 2007

Scrapbook Take Out's Cyber Crop!

I'm under the weather again, but trying not to let that stop me! Scrapbook Takeout is having a Cyber Crop all weekend long! (Today is the last day, but images can be posted through midnight EST tomorrow!) We've been having a blast with all kinds of silly games, door prizes, and 15 awesome challenges!

I believe the only challenge that remains will be the one for children, hosted by my own daughters! It'll be posted at 2pm EST today! Definitely join in!

I'm going to list the inks from my "Name That Color" card challenge in the comments for that blog post! It was a blast, but I think noone was creating during that hour... just hunting Ranger's website and making a few new addicts of them!

Anyhow... here are a few of the challenge entries that I managed!

E - Easter Egg Hunt


O Magazine PageClub Scrap DigiGoodies Kit Refresh 02/07 Papers, Bambino Font, and My Kids' Photos by Me!

This layout was created for Francine's Ad Challenge using this page of an old O Magazine!

The text reads:
E - Easter Egg Hunt April 16th, 2006
The kids adored having their Easter Egg Hunt at Mimi & Papa's house this year! They bonded so well with Jordan & Jason! They also could no resist helping one another on their quests!

While they can squabble at home, they can't help but cooperate everywhere else!

Attraction

Club Scrap DigiGoodies Ivory Elegance 12/06 Kit plus Xtra from Farmer's Market 10/06 DigiGoodies Kit; Girls Are Weird Font; Created for the "-tion" challenge where you needed to use a word ending in "-tion" as your title/theme.
St Patrick's Day Card/Birthday Card

Club Scrap Refresh 02/07 Greetings to Go & Fizz 01/07 Crazy About Fizz UM Stamps; Ranger NonStick Craft Sheet and Nick Banktock Sapmoss Green & Chartreuse Leaf Ink Pads; Angelwings Radiant Pearls Bitter Apple; Niji Waterbrush; Sizzix Hearts #38-0157;

This card was made for the altered die cuts challenge AND for a little girl's St Patrick's Day birthday! I layered die cuts, stamped on them, layered heart stamps, used monoprinting with water and ink, then water and Radiant Pearls!

Spring Squash Book ClosedSpring Squash Book Open

Club Scrap: Painted Desert 5/05 Sand & Embossed Sky Solid Papers, Nature's Wonders 5/06 Daisy Stencil, Matte Board, Bookbinding, Padding, & Laminating Adhesive, ColorBox Stylus with Sponge Tips; Ranger: Adirondack Ink Pads in Juniper, Lemonade, Peach Bellini, & Shell Pink; AC Moore: Bargain Ribbon;

I created this mini squash/explosion book for the "No Patterned Papers" challenge!

Wheel and Sprocket Charm Bracelet DigiLayout

I made the bracelet using my own the Club Scrap Wheel & Sprocket 8/06 CSt Bracelet Project and a few other Club Scrap Beads. The layout used Club Scrap Digital Kit for Wheel & Sprocket 8/06 plus plus DekoSide Font.

This little digi layout was actually for an early challenge to do a layout of an object, no humans allowed! It is also made specifically for my 6x4 Kodak Digital Picture Frame!

Thursday, March 15, 2007

Distress Ink Monoprinted Bookmarks by 1st Graders!

These bookmarks were created by my daughters' First Grade class! Each of the kids selected one color of my Club Scrap Cardstock Pieces first, then some stamps, and together we selected the ink colors, in the end, using nearly the complete line of Ranger's Distress Inks! We pressed each ink color on my Ranger Non Stick Craft Sheet and then misted the inks with water before the kids' pressed their glossy paper into the inks, then swirled, swiped, bent and striped it, etc until they were satisfied! (I helped cover a few white spots for them.) Then we ran adhesive across the backs of the inked paper and stuck them right down onto the Non Stick Craft Sheet and stamped over the papers with Ranger's Waterproof Archival Inks and Club Scrap Stamps! Then, while each child cleaned their fingers, I adhered the inked papers to the cardstock, laminating them all at home!

Club Scrap/Ranger Distress Monoprinted Bookmarks by Ms Theodore's 1st Grade Class
Club Scrap/Ranger Distress Monoprinted Bookmarks by Ms Theodore's 1st Grade ClassClub Scrap/Ranger Distress Monoprinted Bookmarks by Ms Theodore's 1st Grade Class

They did such a beautiful job! Each child selected one bookmark to keep and one to contribute to the Class Auction Project! They also each made Japanese Stab-Bound Mini Books last week and I'm going to bind one Writing Workshop story per child, with about the author pages, into a Hand Stitched Journal. Along with all of these handmade goodies, parents are contributing towards storebought books and book related items, some additional handmade surprises, and an unfinished wood nightstand bookcase! Rocky's Ace Hardware of Millis is also donating the winner's choice in colors for one quart of paint or stain and advice to complete the bookcase!

I've also donated a complete Mini Kit For a Cause Handmade 6"x6" Postbound Scrapbook with ALSB Layouts (ready-for photos) and accompanying cards, stamps, stencil, and more! This will be a separate auction item!

I've had such a blast working with the kids in the classroom, and especially loved the enthusiasm from some of the boys... including the extra twinkle when one worked with purples and pinks! So adorable!

I will also be making bookmarks (die cut shapes and possibly this same ink technique as separate options) at the Millis Girl Scouts Craft Expo on March 25th! It will be from 12:30-3:00PM at the Church of Christ, with a $2 entry fee for adults (children under 19 are free!), with plenty of crafts to make and buy as well as a full concession stand to benefit the Girl Scouts of our town! (We will even have extras of my daughter's homemade GS Cookie Inspired Chocolates for sale at our booth! Mmmmmmm!!)

Tuesday, February 27, 2007

Ink Your Clay! New Tutorial!

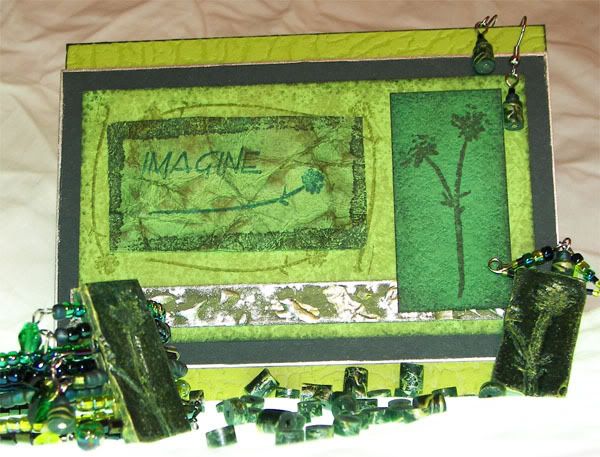
Imagine Card and Jewelry Set

Imagine what you can create when you take the same inks off of your cards and layouts and add them to piece of clay! Learn how to create the jewelry set on this page at moved to this blog, click to get to the post!

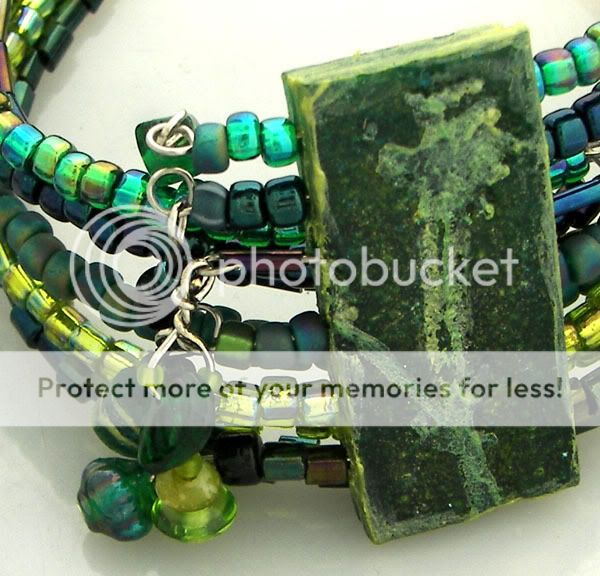
Refresh Cuff Bracelet, Dangles Detail

I have a new tutorial up at moved to this blog, click to get to the post that teaches you some of the many ways that you can add ink and embossing powder to polymer clay for your creations! There are also tutorials by me that go over how to Watercolor With a Waterbrush and the Stenciling Revisited class!

Refresh Cuff Bracelet, Pendant, and Earrings

Supplies used on jewelry pieces:
  • Club Scrap: 2/07 Refresh Beads; 8/06 Wheel & Sprocket Beads; 1/06 Framed Beads; 5/03 Aromatherapy Borders & Backgrounds Unmounted Stamps;
  • Ranger: Adirondack Dimensional Pearls in Lettuce; Archival Ink Pads in Library Green & Teal; Archival Reinker in Library Green; Cut n' Dry Foam; Distress Embossing Powder in Peeled Paint; To DYE For in Blue & Green; UTEE Brightz in Blue Iris, Green Zinnia, & Violet;
  • Amaco: Bead Baking Rack; Bead Making Tool Set; Polymer Clay & Craft Oven;
  • Bead & Button: Beading Basics Essential Techniques;
  • Beadalon: 10mm Silver Plated Medium Bale;
  • Blue Moon: Memory Wire Bracelets;
  • Darice: 2" Nickel Plated Head Pins;
  • Design Originals: Clay Techniques to DYE for;
  • Fire Mountain Gems: 4.5mm Silver Plated Jump Ring; Surgical Steel Fish Hook Ball/Coil Earwire;
  • Sculpey: Translucent Polymer Clay;
Supplies used on card:
  • Club Scrap: 2/07 Refresh Dark Green & Light Green plus Spritzer Bottle; 10/06 Farmer's Market Leaf; 5/06 Painted Desert Embossed Stem; 3/04 Culinary Green; 5/03 Aromatherapy Borders & Backgrounds Unmounted Stamps;
  • Krylon: Silver Leafing Pen;
  • Ranger: Adirondack Alcohol Ink Metallic Mixatives in Silver; Adirondack Dimensional Pearls in Lettuce; Archival Ink Pads in Library Green & Teal; Cut n' Dry Foam; Distress Ink Pads in Peeled Paint & Shabby Shutters;

Friday, February 23, 2007

Monoprinting: a great way to have bursts of color on your work!

Monoprinting with the Ranger Non Stick Craft SheetClub Scrap Painted Desert and Road Trip Kits

When I first was reading about this technique, with its proper name, it involved using specialized monoprinting sleeves... I improvised by using a pair of write on transparencies. But, I have since learned that it is soooo much easier to use the Ranger Non Stick Craft Sheet (which I already use every time I ink and glue)!

The ATC, in the right hand image above, was created with the transparencies, Club Scrap 3/05 Road Trip White Paper, Club Stamp 5/05 Painted Desert Unmounted Stamps, Ranger Black Pigment Ink & Black Embossing Powder (the edges of the ATC are inked and embossed also), and ColorBox Ancient Page Harbor, Lime, & Neptune Inks. I applied inks to the paper by dripping reinkers, one color onto the papers at a time, onto a transparency and used the ColorBox Stylus to spread it out, then sandwiched a blank transparency on it and pressed unevenly. I then spritzed the side of the transparency that I was using with the Ranger Perfect Ink Refresher and laid the cardstock onto the damp transparency. I sandwiched the transparencies again and used a brayer to press the ink into the paper. I then repeated the process with the darker ink.

Club Scrap 2/07 Refresh Club Stamp KitBasically you can press Ink Pads onto the craft sheet, drip and drizzle Reinkers on it, pounce ink on, smear glitter glue onto it, add Paints, drip or draw onto it with Alcohol Inks, dilute with Alcohol Blending Solution or even spritzes of water (for water based inks) and then take your intended project surface and press it onto the inks, swirl or swipe as you lift and marvel over the finished piece! You can also press portions of the Non Stick Craft Sheet onto itself before adding the inks to your project to get more of an ink blot effect! Glossy Paper is wonderful for this technique, but anything will do! The glossy surface just helps the ink travel and fills the paper better.

In the ATC to the right and in the title image for this Blog entry, I used a combination of Ranger Alcohol Inks in Lettuce & Stonewashed, Ranger Alcohol Blending Solution, and Ranger Stickles in Waterfall to create a backdrop for the stamped scratch marks, frame, and focal image. On the ATC, I used also Ranger's Aqua Adirondack Paint Dabber, Adirondack Bottle, Lettuce, & Stonewashed Ink Pads, and Archival Cobalt & Teal Ink Pads as well as Club Scrap's Glossy Paper plus the 2/07 Refresh Kit's CSt UM Stamps, CSt WM Statue & Fern Collage Stamp, Dark Blue, Light Blue, Dark Green, and Light Green Papers.

The mattes in the layout below were created with Glossy Paper and Alcohol Inks using a combination of monoprinting and direct pouncing with Alcohol Inks. I dry embossed Tinkerbell with a Plaid Embossing Stencil. The papers are all Club Scrap, using the Mint Frost and Cream Frost from the 1/04 Asian Artisan Kit, and unfortunately unlabelled other CS papers. (I didn't post details in the past!)

Club Scrap

Below is another sample made with alcohol ink monoprinting, as you can see in the upper right, eventually the colors will blend all the way, simply soak it up and add new inks! I misted rubbing alcohol onto the Glossy Paper and onto the craft mat, dripping Alcohol Inks at random. Then I laid the Glossy Paper face-down on the inked mat and swirled, swiped, and lifted. I used Club Scrap's 9/05 Science Unmounted Stamps, 7/05 Wings Apricot Paper, and Glossy Paper along with Ranger's Non Stick Craft Sheet, Adirondack Alcohol Inks in Butterscotch, Caramel, & Terra Cotta, and Adirondack Ink Pads in Butterscotch, Caramel, Rust, & Terra Cotta.

Club Scrap 9/05 Science Kit and 7/05 Wings Kit

Below is the new logo for my tutorials at Diversity Designs! I applied small "spatters" of Ranger's Alcohol Inks in Bottle, Lettuce, and Stream to the Ranger Non-Stick Craft Mat, added the Alcohol Ink Blending Solution, then took Glossy Paper and pressed it onto the sheet, swirling and lifting until the paper was well covered. I added more ink and targeted the white areas. After the paper was filled with ink, I added a little Adirondack Metallic Mixatives in Copper to a felt applicator and pounced away! The black art work is a self portrait of me that was then altered by Roselyn!

Ink Splatters Banner, Created With Alcohol Inks

Tim Holtz also teaches a version of this with his Distress Inks and calls it Wrinkle Free Distressing. With it, you will often spritz the craft sheet or your project material with water and then iron your finished piece to keep the wet work from warping. Ranger has posted one project with instructions for a Monoprint Card plus Distress Ink Tips. Pennywise Arts has a great online class on Monoprinting with Alcohol Inks.