Neith"s Crafty Creations - image created with Club Scrap DigiDeluxe Refresh and Serengeti Kits
Showing posts with label Kit: 2007/02 Refresh. Show all posts

Sunday, July 5, 2009

9 More Layouts, 1 Formula, 3 of Clubs

What else can you get when you combine 4 sheets of paper, 2 mattes/another sheet of paper, and one ALSB Idea Deck Card? Plenty more great layouts, of course! Here are 9 layouts that I created using the 3 of Clubs card from the ALSB Idea Deck Vol. 2! (Check out the ALSB, Assembly Line ScrapBooking, definition to the right!)

Montreal Mall 3 of Clubs Left by Neith JuchMontreal Mall 3 of Clubs Right by Neith Juch

Montreal Mall 3 of Clubs Left by Neith Juch

Montreal Mall 3 of Clubs Right by Neith Juch


Club Scrap: ALSB Idea Deck Vol 2 - 3 of Spades; Matrix - Red Print; Cruisin' - Black; Science - Topaz Foil Print; Artifacts - Sky Blue;
Scrapbook Takeout - Red Felt Thickers;

We're still not quite sure what these people-cutouts, 80s themed workout photos, and cell phones have to do with one another, but the girls had a blast playing in the cutouts at the Montreal mall! The original ALSB design sandwiches 3 small mattes and thin strips together, but I like the thin strips to spread out a bit and to leave the three adjacent mattes uncut, for now!

Crochet Produce Bags, 3 of Clubs right by Neith Juch


Club Scrap: ALSB Idea Deck Vol 2 - 3 of Clubs (right); Common Threads 3/09 - Teal; Avant Garde 3/08 - Green; Fizzin' Blue 2008 - Green Print; Stratosphere 4/07 - Dark Blue Print, Stickers;
Scrapbook Takeout: Wonderland 3/09 - Fancy Pants Felt Shapes, KI Memories Chipboard Shapes, Punchinella Ribbon;

I have fallen head over heels for this Crochet Grocery Bag Pattern By Haley Waxberg! It's a simple combination of single crochet, chain, and slip stitches to create a wonderfully stretchy netted produce/shopping bag. I altered the pattern, just a little, in between the increasing rows, I did one less row than called for and did 12-14 of the ch5 rows as the main body.. also, I thickened my straps a little and used 100% cotton by Lily and by Bernat.

I combined the photo with some coordinating papers, earthy embellishments, and the fun punchinella ribbon, that reminds me of the bag's open pattern. I love drawing my color scheme from my photographs and really enjoy mixing and matching papers from different kits to do so! Having a handmade swatch ring of my Club Scrap cardstock is invaluable for this style of scrapping!

Montreal Gargoyles, 3 of Clubs Left Digital Layout by Neith Juch


Club Scrap: ALSB Idea Deck Vol 2 - 3 of Clubs Left; A Study in Red Digital Kit 1/08; Milestones 12/09 Digital Kit; Digital Inked Edges Vol 1;

One of the great things about digital scrapbooking is that you can easily create 12" wide panoramic photographs without any extra expenses! Another great thing is that when you adore the rich texture of a Club Scrap paper you can go ahead and zoom in on it to really emphasize the pattern in your digital layouts!

Boston Childrens Museum 2003, 3 of Clubs by Neith JuchBoston Childrens Museum 2003, 3 of Clubs by Neith Juch

Boston Childrens Museum 2003, 3 of Clubs by Neith Juch

Boston Childrens Museum 2003, 3 of Clubs by Neith Juch


Club Scrap: ALSB Idea Deck Vol 2 - 3 of Clubs; Great Outdoors 10/07 - Mushroom, Green Text Weight Print, Light Green, Dark Green, Dark Green Print, Light Green Tags; Hybrid Ink Pad - Earth;

Adding a lightly inked edge really helps distinguish one piece of paper from another and helps maintain the illusion of 12" long strips hiding under an overlapping matte. Just remember not to ink the edge that is hidden under or alongside the matte!

Bridge, 3 of Clubs Right by Neith Juch


Club Scrap: ALSB Idea Deck Vol 2 - 3 of Clubs Right; Bridges Digital Kit 2/08 - CS03; Great Outdoors 10/07 - CS01, CS02, CS08; Refresh Digital Kit 2/07 - PLtBlue1; Farmer's Market Digital Kit 10/06 - CSBrown;

When working with digital scrapbooking, never be afraid to alter the hue of your elements to make them coordinate with your layout! For this layout, I loved the printed wooden bridge from the Refresh kit, but the color would have completely clashed with my layout... so I used Ctrl-U to alter the hue, saturation, and brightness of the print until it blended perfectly with my layout!

Peabody Essex Museum Owl Sculpting, 3 of Clubs Left by Neith Juch


Club Scrap: ALSB Idea Deck Vol 2 - 3 of Clubs; Let Me Count the Ways Digital - Paper; Mirror Mirror Digital - Paper, Transparencies, Digital Font;

I took full advantage of digital scrapbooking in order to copy random stripes from the transparency overlay image to create borders for my photographs and "paper" strips. With the outline nature of the Mirror Mirror font images, it was easy to cut and paste some of the digital cardstock into the text to help continue the style. I also just loved how the patterns on these two prints combined in both pattern and color scheme.

Montreal Botanical Garden, 3 of Clubs Right by Neith Juch


Club Scrap: ALSB Idea Deck Vol 2 - 3 of Clubs Right; Pure & Simple 4/09 - Digital Kit; Digi Inked Edges Vol 1;

With digital kits you can always play with the transparency levels of your different layrs and use any color of paper as an overlay to retint a patterned paper that is underneath it. For this layout I took a nearly grayscale background paper and tinted the lighter areas green by layering up a green cardstock image over it with the overlay style. I also retinted some of the paper from lime green into a deep purple to coordinate with the flowers to try to maintain the color scheme of the photograph.

3 of Clubs, ALSB Idea Deck Volume 2


Of course, I couldn't leave you without a quick glance at the basic design for this layout formula! When you create your page, never fear to move your elements around and alter the cuts slightly to fit your needs!

Monday, June 29, 2009

10 Cards Using Herringbone and the ALCM Idea Deck

Club Scrap has tons of great ideas to help you with card making! Every month the Club Stamp Rap (full color newsletter that comes with the monthly Club Stamp membership kit) includes images of 15 great cards that are often created by members, using that month's kit. There are often tips and techniques scattered throughout the Sr, Jr, Club Stamp, and Digital Raps that either deal directly with cards or translate easily to them. There is also a full set of free instructions available to members to help them make 15 cards using the optional monthly Greeting to Go side order. And then there are countless videos in the Cinema with more ideas... And finally, the awesome ALCM (Assembly line Card Making) Idea Deck which has 52 idea cards with full cutting instructions so that you can transform a few sheets of 12x12 and/or 8.5x11 papers into a set of coordinating cards! A sampling of these cards were given away for free during the last PSL (Pro Scrapping League, a multi-week challenge to work as teams to create layouts and/or cards, competing for prizes and discounts... a brand new Summer Camp PSL is opening up on July 6th)!

Today, I'm going to share 2 new cards that I made using the Herringbone Technique that was just featured in a recent CS Cinema episode and some cards that I made during the last PSL using the 5 of Hearts card from the ALCM deck and papers from the Vintage Choice Collection! Enjoy!

Happy Birthday Card, Wings with Herringbone by Neith Juch


Club Scrap: Concrete Jungle 6/09 - Birthday CSt WM Stamp; Milestones 12/08 - Plain Paper in Soft White; Wings 7/05 - Plain Paper in Apricot, Brown, Dark Blue, Light Blue, and Mustard; Hybrid Ink Pad in Earth; Herringbone Technique;
Carpet Tape;

The Herringbone Technique was features in the Henna 5/09 Club Stamp Rap and there is also a great video up in Club Scrap's cinema that teaches the technique! Basically you take thin scraps of cardstock and adhere them to carpet tape (from the hardware store) or another equally sticky surface, and lay them out in a Herringbone-like pattern then trim away! very simple and lovely! Use plain cardstock, printed papers, or stamp all over them before cutting... use left over scraps or cut up some extra paper, anything goes! It's a really great way to use up tiny scrap from your projects! I wound up diving into my ziplock baggies with old scraps in them and trimmed the strips to some skinnier pieces!

Birthday Card, Collections and Herringbone Technique by Neith Juch


Club Scrap: Concrete Jungle 6/09 - Birthday CSt WM Stamp; Collections 6/06 - Plain Paper in Red, Saddle Brown, Tan, and Teal;
Ranger: Adirondack Dye Ink Pad - Stream;
Carpet Tape;

5 of Hearts ALCM Cards using Vintage Choice DIY papers by Neith Juch


Club Scrap: Idea Deck Assembly Line Card Making - 5 of Hearts; Vintage Choice Kit: DIY Green Block Print, DIY Light Tan; Extra Extra 6/04 - UM; Rhapsody 3/07 - UM; Refresh 2/07 - UM;
Ranger: Adirondack Dye Ink Pads - Latte, Starfish Green, Meadow; Distress Ink Pad - Walnut Stain;

What do two sheets of 12x12 paper do when thrown into a PSL final challenge? Why, pair up with the Assembly Line Cardmaking Idea Deck's 5 of Hearts and become a quick set of 4 cards, of course! And I love this recipe since it creates cards which fit into standard invitation sized envelopes while also working quite easily with printed papers and stamps! Or toss some simple embellishments onto the smaller rectangle to finish out the cards!

5 of Hearts ALCM Cards using Vintage Choice DIY papers by Neith Juch


Club Scrap: Idea Deck Assembly Line Card Making - 5 of Hearts; Vintage Choice Kit: DIY Purple Print, Time & Space Mauve Dust; Ivory Elegance - UM; Chapter One UM; Unknown Flowers and Brads; FFC Ways of Stamping - UM; Palette Hybrid Ink Pad - Noir Black;
Colorbox: Unknown Purple Ink;

Stay tuned for some more ALCM Idea Deck cards, coming soon!

Monday, December 1, 2008

Nature's Bounty and Beauty - 3 Digital Layouts


Topsfield Fair 2008 by Neith Juch


Milestones 12/08 CS DigiKit;

Really get the colors to pop on your prints by layering on another copy of the same print (or a solid) and applying the Layer Style of Overlay to it! Be sure to grab colors from your page to use for your fonts.

Sometimes a crisp and clean color block treatment is just what you need for a layout! To create a perfect color block in PSE, Click on View: Grid and use Edit: Preferences to adjust the spacing of your grid lines. You'll want to check off View: Snap To: Grid. You can resize elements to fit within the gridlines and also use the rectangular marquee tool in order to cut away anything that falls outside of the grid lines that you want to use.

Thoreau's Lake by Neith Juch


Refresh 2/07 DigiGoodies; Scan of my own inked edge paper;

There are times when a photo speaks for itself and very little else is needed... and other times when you just want to add an image to a favorite quote.

 by Neith Juch


Body and Soul 5/08 DigiGoodies;

I know that I have more photos of Lynch Park than I can count... but I have spent so much time there between my own childhood and sharing it with my children. I think that this is the only very low tide photo that I've scrapped though!

Saturday, November 8, 2008

The Natural and the Unnatural - 4 Digital Layouts

Here are a few of my recent digital layouts for you guys!

Uatchet in the Mirror Maze


Club Scrap: Mirror Mirror 11/08 CSDigi Sr Kit;

Uatchet in the Mirror Maze
With so many arrows to choose from, it's so easy to cut one out of a printed tag, or use the stencil shapes to cut arrows where none existed before! Layer them up, copy and paste sections of the arrows from the background print to make it overlap one of them... Add a tall and skinny photo and even borrow a natural border from the photo to help matte it! In no time you'll have the perfect layout! (Of course, if your photo also happens to be of your daughter's first adventure in a mirror maze, then things will really fall right into place!)

Look! - Sebek and the Stag Beetle


Private Eye CS DigiGoodies Kit 10/08;

Look! - Sebek and the Stag Beetle
Zoom in on a photo by enlarging a section of it and clipping it to fit inside the magnifying glass. Create a shaded glass overlay by duplicating the layer with the photo and using Layer Style >> Wow Plasic in Photoshop Elements.

The Awesome Power of Nature


Club Scrap: Retreat 2007 Digital Kit - PS06; Refresh 02/07 Digital Kit - PLtGreen, PTrans, Trans14, Trans18;
Fonts: CoventryGarden, Glider Girls;
Photoshop Elements 5.0: Blending Modes - Difference, Overlay; Altered Hues;

Triceratops


Club Scrap: Avant Garde 3/08 Digital Kit - DP; Great Outdoors 10/07 Digital Kit - Xtra66, Xtra67, Xtra68; Collections 6/06 Digital Kit - Alpha;
Adobe Photoshop Elements: Blending Mode - Multiply; Drop Shadow - Soft Edge; Altered Hues;
Personal Scan of a Tile;
Clay Sculpture by Nekhebet;

Sunday, June 1, 2008

Digital Calendar Pages

If you didn't notice, in the top left of my blog, you always see a calendar page for the current month... These pages are created with Club Scrap's Digital Calendar Kit (and sometimes a little extra from my digital stash) and work not only for my blog, but as a great printed gift to give people each year! One very affordable way to do so is to print them at around 8x10 inches at home or at a copy center, onto your cardstock, trim, and place into one of the acrylic box shaped photo frames that are always for sale at the major craft chains! Then you can give refills to your repeat recipients each year!

Here are the most recent three digital calendar pages that I've posted!

June 2008 Digital Calendar by Neith

Club Scrap: 2008 Digital Calendar Kit 2008 - September Be Still Layout with June Brush; Be Still 9/07 Digital Kit - CS02, CS05, CS08, Tran02;
Font: Tribal Two;

May 2008 Digital Calendar by Neith

Club Scrap: 2008 Digital Calendar Kit - February Refresh Layout with May Brush;
Scan of my own inked edge paper;

April 2008 Digital Calendar by Neith

Club Scrap: 2008 Digital Calendar Kit 2008 - March Rhapsody Layout with April Brush;
Font: Belisa Plumilla Manual;

Thursday, May 15, 2008

9 Layouts, 1 Digital Hybrid Card, and Tons of Free ALSB Instructions!

I just had to share a few more creations before posting more FFC Exclusive kits!

The first is a Digital Hybrid Invitation that I made with the brand new Club Scrap After 5 Digital Kit... Log into http://clubscrapchat.com tonight at 7 PM Central for a live online class with Jacqueline Carney, using this kit!

After that, I have a bunch of layouts to share using my favorite ALSB instructions from Club Scrap's Pro Scrapbooking League Scrapper Bowl Scramble Challenge! In under two days, Club Scrap challenged us to create as many layouts as we could, using any of the 28 new ALSB designs that they released for the challenge! Download all of the layouts for free at http://www.clubscrap.com/08PSLScramble.pdf! In this post I'm just using the instructions for layouts 11, 12, 15, and 16!


Digital Hybrid Invitation by Neith Juch

Club Scrap: After 5 2008 Digital Kit - DP02, DP05, DP08, Expansion16, Expansion17, Tran03, Tran07, Tran11; Sparkle 12/07 - Brown Metallic Paper; Serengeti 11/07 - Yellow Paper;
Font: Spellbound;
Ranger: Distress Ink Pad - Walnut Ink;

Planning a fun get together? Grab a few kit elements, create an exciting layout, print it as a photo and slap it on some coordinating paper mattes, pop it in the mail, et voila! You're sure to have a full house!


PSL ALSB Scramble #11 Digital - Supermercado

Club Scrap: PSL ALSB Scramble #11; Farmer's Market 10/06 Digital Kit - CSBlue, CSLeaf, CSPBlue, CSPBrown2, CSPPumpkin Trans Sunrise;
Adobe Photoshop Elements 5.0; Blend Modes - Difference, Exclusion, Overlay; Altered Hues, Sharpen; Drop Shadows;
Font: Zero & Zero Is;

PSL ALSB Scramble #11 - Drive My Car

Club Scrap: PSL ALSB Scramble #11; Bistro 7/07 - Gold; Chapter One 6/07 - Red; Stratosphere 4/07 - Dark Blue; Refresh 3/07 - Dark Green; DIY 2003 - UM Font;
Ranger: Adirondack Pigment Ink Pads - Pitch Black, Snow White;

PSL ALSB Scramble #11 - Joy In Every Journey

Club Scrap: PSL ALSB Scramble #11; Retro 9/06 - Dark Raspberry; Wheel & Sprocket 8/06 - Black Print, Red Plain, Purple Cut Outs; Evergreen 12/03 - Green Handmade;

Note: There will be a companion page with journaling about this trip in a tow truck... the girls got official police authorization to share a seat and it got a bit funny, especially when we had a police escort in the breakdown lane during a traffic jam!

PSL ALSB Scramble #12 - Air Play

Club Scrap: PSL ALSB Scramble #12; Avant Garde 3/08 - Light Aqua Sr Print; Chapter One 6/07 - Red; Stratosphere 4/07 - Dark Blue, Jr Alphabet Stickers; Refresh 3/07 - Dark Green; DIY 2003 - UM Font;
Ranger: Adirondack Pigment Ink Pads - Pitch Black;

PSL ALSB Scramble #12 - Sandal Thief

Club Scrap: PSL ALSB Scramble #12; Avant Garde 3/08 - UM Stamps, Starburst Stencil; Bistro 7/07 - Grape; Farmer's Market 10/06 - Blue, Leaf; Wings 7/05 - Apricot Raised Print;
Ranger: Adirondack Dye Ink Pads - Ginger, Pitch Black;

PSL ALSB Scramble #15 - Swinging With Cousin Jake

Club Scrap: PSL ALSB Scramble #16; Avant Garde 3/08 - UM Stamps; Sparkle 12/07 - Brown Metallic; Serengeti 11/07 - Brown, Dark Teal, Light Teal; Farmer's Market 10/06 - Leaf;
Ranger: Adirondack Dye Ink Pad - Pitch Black;

PSL ALSB Scramble #15 - Fishing on Lake Ontario (left)PSL ALSB Scramble #16 - Fishing on Lake Ontario (right)

PSL ALSB Scramble #15 - Fishing on Lake Ontario (left)

PSL ALSB Scramble #16 - Fishing on Lake Ontario (left)

Club Scrap: PSL ALSB Scramble #16; Serengeti 11/07 - Yellow, Brown; Fossils 8/04 - Rust Print, Kraft Print, Green, Jr Alphabet Stickers;

PSL ALSB Scramble #16 - Brownie Troop Pals

Club Scrap: PSL ALSB Scramble #16; Sparkle 12/07 - Brown Metallic; Serengeti 11/07 - Brown, Dark Teal, Light Teal; Farmer's Market 10/06 - Leaf;
CTMH: Make New Friends UM Stamps;
Crayola: Watercolor Paints;
K&Co: Brownies Scrap Pad;

Note: I used up a bunch of scraps on this layout! Not only did I use tiny cuts from my Club Scrap scraps, but also unused remnants from a cardmaking event that I put on for our Brownie troop!

Sunday, May 4, 2008

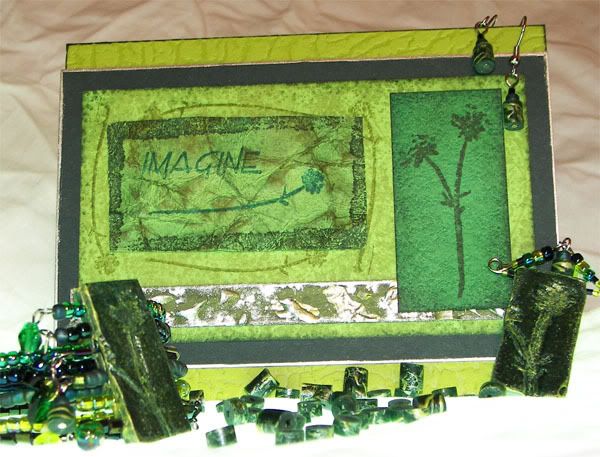
Ink Your Clay Tutorial

The site where I used to have this tutorial recently went down... So I hunted to find my copy of the original to post here for you! I hope you enjoy!

Ink is for more than just paper and altered arts. Did you know that you can also use your inks to create custom colored polymer clay?
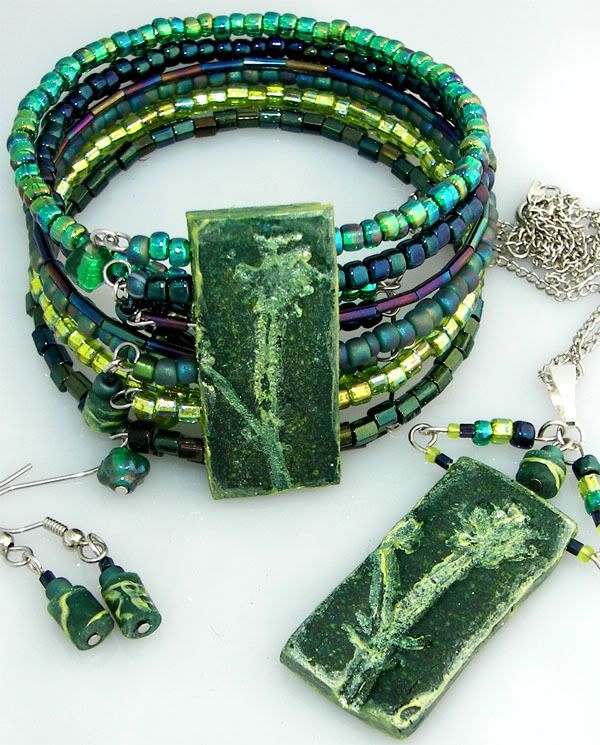
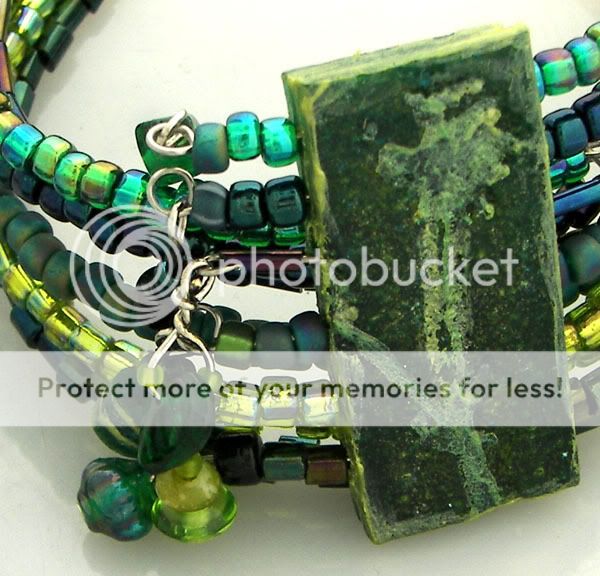
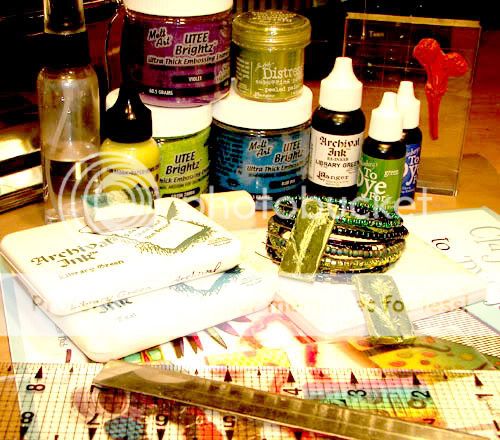
Design Originals has a great book, Clay Techniques to "DYE" for, which teaches you all kinds of ways to use Ranger inks and embossing powders to color your clay, along with over 20 projects. I took inspiration from their coloring techniques to create my own clay blend… which I then used to create a series of tube beads, a pendant, and a six-holed focal spacing bead for a bracelet modeled after Heather Powers Cuff Bracelet from Bead & Button: Beading Basics Essential Techniques and https://www.humblebeads.com/blog/throw-back-thursday-bead-edition
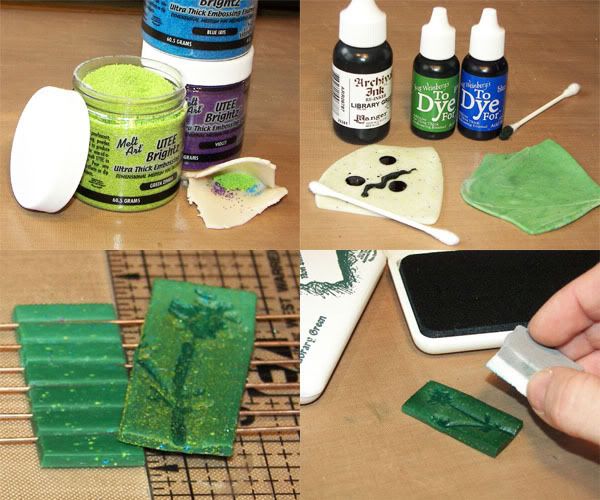
UTEE is wonderful for tinting your clay to a small degree while embedding grit and variability into the piece. Translucent clay will allow the differing levels of color shine through. To tint clay with UTEE, first condition your clay by running it through your clay machine at the thickest setting until it is pliable. Pinch your clay into a pocket and add no more than 2 teaspoons per full bar of clay. Seal the pocket and run it through your clay machine, folding between each run, until the UTEE is evenly dispersed.
Even with UTEE Brightz, the clay will still be light in color when you cure it. So, at this point, you may wish to add dyes to the clay to give it a deeper color. Be sure to put on some gloves for this part because the liquid ink can get messy! Take your conditioned clay and add some drops of Archival Reinkers or To Dye For to the surface of your sheet. Spread it out with a Q-Tip and fold the clay over, keeping the inked surface covered. Run it through the clay machine, at the thickest setting, folding between runs until the color is even.
You may opt to create a faded sheet of clay by merging two colors, or go with just one. Mold your clay as you wish and then you can also color the surface of your piece by stamping on it, pressing additional embossing powders into it, using Adirondack Pigment Pens and Adirondack Dimensional Pearls paints, using Cut n' Dry Foam to apply more Archival Ink, etc. If you have too much clay left over, you may save it or use it to make a series of small beads. Cure according to the instructions on your clay package and marvel over your finished work!
One wonderful thing about using your inks, powders, and stamps to create clay pieces is that you can create gift cards or scrapbook pages with the same materials for a wonderfully coordinating set!
Supplies used on jewelry pieces:
  • Amaco: Bead Baking Rack; Bead Making Tool Set; Polymer Clay & Craft Oven;
  • Bead & Button: Beading Basics Essential Techniques;
  • Beadalon: 10mm Silver Plated Medium Bale;
  • Blue Moon: Memory Wire Bracelets;
  • Club Scrap: 2/07 Refresh Beads; 8/06 Wheel & Sprocket Beads; 1/06 Framed Beads; 5/03 Aromatherapy Borders & Backgrounds Unmounted Stamps;
  • Darice: 2" Nickel Plated Head Pins;
  • Design Originals: Clay Techniques to DYE for;
  • Fire Mountain Gems: 4.5mm Silver Plated Jump Ring; Surgical Steel Fish Hook Ball/Coil Earwire;
  • Ranger: Adirondack Dimensional Pearls in Lettuce; Archival Ink Pads in Library Green & Teal; Archival Reinker in Library Green; Cut n' Dry Foam; Distress Embossing Powder in Peeled Paint; To DYE For in Blue & Green; UTEE Brightz in Blue Iris, Green Zinnia, & Violet;
  • Sculpey: Translucent Polymer Clay;

Supplies used on card:
  • Club Scrap: 2/07 Refresh Dark Green & Light Green plus Water Mister; 10/06 Farmer's Market Green; 5/06 Painted Desert Stem; 3/04 Culinary Green; 5/03 Aromatherapy Borders & Backgrounds Unmounted Stamps;
  • Krylon: Silver Leafing Pen;
  • Ranger: Adirondack Alcohol Ink Metallic Mixatives in Silver; Adirondack Dimensional Pearls in Lettuce; Archival Ink Pads in Library Green & Teal; Cut n' Dry Foam; Distress Ink Pads in Peeled Paint & Shabby Shutters;

Sunday, April 27, 2008

Digital Templates - 9 New Layouts & 1 Free Template

Starting in 2008, Club Scrap has begun offering Digital Templates to use for your layouts. These are layered images that you can add any digital papers, embellishments, and photos to while using the same layout structure completely, or partially. To help visualize the process, I've included a picture of each layout's components as well as the finished layout... and at the bottom of this post you can get a free template that I created!

The Palace of Love - Ingredients

The Palace of Love

Club Scrap: From the Heart 2008 Digital Kit - Template #1, CS01, CS02, CS07, Fbr01, Fbr06, Tag30;
Fonts: The King & Queen; Passions Conflict;

The photos are of an installation at our favorite local art museum from last year! I used the first template in the From the Heart kit on this one and warped a few sizes, rotated and resized the inked edges to add them to the photos, and altered the hues.

The Sentinel - Ingredients

The Sentinel

Club Scrap: From the Heart 2008 Digital Kit - Template #1's inked edges; Serengeti 11/07 Digital Kit- CS05,CS06, CS07, CS08; Refresh 2/07 - Trans04, Trans05, Trans16, Trans17, Trans18;
Font: Dali;

I used only the inked edges from From the Heart 2008 DigiTemplate #1, altered hues, and "die cut" the digital papers.

The Sentinel by Thomas Frederick Hoppin c. 1851, one of the first large scale bronze sculptures case in the United States and installed at Roger Williams Parks Zoo where it is a favorite of many children. 9/17/2006

Spring 1994 - Ingredients

Spring 1994

Club Scrap: A Study In Red 1/08 Digital Kit - ALSB Layout 03, CS08, CS09, Fibr05, Tag19, Xtra14; From the Heart 2008 Digital Kit - Template 10;
Font: Passions Conflict;

I combined an ALSB Layout with a different template and some additional elements to create a layout somewhere in between the two!

Corn Husk Dolls - Ingredients

Corn Husk Dolls

Club Scrap: From the Heart 2008 Digital Kit - Template #10; Be Still 9/07 Digital Kit - Trans05; Centennial 2007 Digital Kit - CS01, CS03, CS04, CS07, CS09, Fibers10, Fibers11, Trans08, Xtra47;
Aquiline Two Font;

From a Native American Festival that my mom took the kids and some Russian exchange students to... the kids & my mother made those corn husk dolls!

Corn Husk Doll Mug - Ingredients

Corn Husk Doll Mug


I borrowed the overlapping photos from the template, actually borrowing from my layered Corn Husk Doll layout, to create this insert for my coffee tumbler.

LobsterFest - Ingredients

LobsterFest

Club Scrap: From the Heart 2008 Digital Kit - DigiTemplate #7; Rhapsody 3/07 Digital Kit - CS01, CS05, CS10, Trans05, Trans06, Trans11, Trans15, Trans22;
Font: Belisa Plumilla Manual;

Candyland - Ingredients

Candyland

Club Scrap: A Study in Red 1/08 Digital Kit - CS01, CS03, CS08, Tag24; From the Heart 2008 Digital Kit - Template #5, Fbr02, Fbr05;
Font: Concrete Shoes;
Lyrics from Oreo Candy Bites Commercial, sung by Melanie Horsnell of Forever Thursday;

Walk for Autism Research Gametime - Ingredients

Walk for Autism Research Gametime

Club Scrap: From the Heart 2008 Digital Kit - Template #3; Surf's Up! 7/06 Digital Kit - CSBlue, CSDkGreen, CSPSalmon2, Fiber09, Trans02, Trans15;
Font: Hobby;

501st Garrison - Ingredients

501st Garrison

Club Scrap: From the Heart 2008 Digital Kit - Template #2; Sparkle 12/07 Digital Kit - CS01, CS02, CS10, CS11, Fbr03, Fbr14, Tran20, Tran22, Xtra15;
Font: Passions Conflict;

Bald Eagle Cotton Candy Spider and the Fly


These three layouts each used templates from their respective digital kits and the details can be found in their blog post by clicking on the thumbnails above! The two from Bridges 2/08 stay fairly true to the templates, but the Avant Garde 3/08 layout only uses the chrome ring from the template.

Cotton Candy

Club Scrap: Avant Garde 3/08 Digital Kit - Apricot JR Print 05, White JR Print 06;
Font Garden: FG Amelia Computer Font;
Scan of my own hand-drawn lines;
Photoshop Elements: Distort - Warp;

This is a layout that I created using the Avant Garde 3/08 Digital Kit along with scans of my own doodles, the Distort: Wave Filter, and some drop shadows. I've included a free template for you to make this layout! Please right-click to save this link. http://neithj.googlepages.com/TemplateScribbleStrips.psd