Neith"s Crafty Creations - image created with Club Scrap DigiDeluxe Refresh and Serengeti Kits
Showing posts with label Jewelry Making. Show all posts

Saturday, May 9, 2009

Help Kids Help Kids Charity Bazaar


Beaded Charm Bracelets by Uatchet, Nekhebet, and Neith Juch


On Saturday, May 9th, my girls and I will be at the Help Kids Help Kids Charity Bazaar in the Framingham Circle Furniture from 10AM until 1PM! The store is at 235 Worcester Road (Rt 9W) in Framingham, MA and there will be mutliple groups of children selling their handmade items to raise money for charities of their choice! It's a wonderful way to pick up a last minute Mother's Day gift, to treat your kids to something in the midst of the Mother's Day weekend, and so much more!

Our table will feature a few dozen handmade beaded charm bracelets (mostly using acrylic, metal, and fimo beads/charms instead of glass and stone), marine life earrings and pendants, and some yummy baked goods! Maybe even a little more! My daughters and their friends designed each of the bracelets and I've been working hard to finish assembling them!

Beaded Charm Bracelets by Uatchet, Nekhebet, and Neith Juch


100% of the sales at our table will go to The Lowell Wish Project which is a wonderful charity that helps provide new and used goods for many other charities, homeless shelters, emergency items in the event of fires and illnesses, families transitioning to apartments from the shelters, and so much more! We felt that it was really important to try and help families that are suffering during these ever-shifting economical times and we've seen families that have benefited directly from this organization, so we knew that we had to raise money for them!

We'd love to see some of you there, or learn about the projects that you are doing in your own family to help make a difference! Thanks!


Beaded Charm Bracelets by Uatchet, Nekhebet, and Neith Juch

Friday, November 7, 2008

Awesome Bracelet from Swap goodies and Prizes!

I just realized that I had not yet scanned the awesome bracelet that I made using Luanne's Charm Bracelet Kit, that I won in her CSChat contest, and charms from the swap that we had at the Club Scrap September 2008 Main Retreat! There are tons of cool finds in it! Luanne hand selected the Scrabble tiles to use my kids' first initials (yeah, in birth order, their initials spell a word!) and the phrase "Be Here Now" in charms along with tons of other goodies, many that I couldn't fit onto the bracelet! I also have another silver charm bracelet that just uses charms from the swap! many of the swap dangles are filled with CS beads and on my other bracelet there are a lot of CS stamps on shrink plastic! I'll have to scan that one for you all later!

Funky Charm Bracelet by Neith

Tuesday, July 22, 2008

Beaded Charm Bracelet

I've been so busy playing with the kids and amassing a huge stack of layouts that I need to scan! But, I've also been making jewelry! I'm in one jewelry swap that ships at the end of the month, then another charm swap to trade at the Club Scrap September Main Retreat, and making plenty of pieces for gifts!

Here is a bracelet that I made for myself using the Club Scrap Rhapsody 3/07 beads with Blue Moon findings!

Rhapsody Antiqued Charm Bracelet

Sunday, May 11, 2008

Happy Mother's Day! Happy Spring!

Here's a little something I made last night with Spring and Mother's Day in mind... Happy Mother's Day to all the moms who read my blog... and Happy Spring to the rest of you!

Lori D inspired me to get out my stampbord and play! Check out her gorgeous mini book featuring Color in Black & White stamps on the Stampbord covers!

Also, be sure to check out Tricia Morris's Stampbord Mini Album Webisode on TvWeekly.com!

Stampbord Believe Pin by Neith


To create my pins, first I began applying the paler inks onto the Stampbord after pressing the ink pad cover onto the pad, then the Stampbord onto the damp pad... The first layer was pink with an all-over application, then I began applying additional inks with a more random approach and smoothed the ink with a piece of Cut 'n' Dry Foam. Then I stamped the dragonflies with Archival Ink and began etching out areas where I wanted white to show through. On the Believe Pin, I also inked the edges then applied the silver leafing pen to the sides and overran it a little onto the front edges.

I haven't yet decided how to complete the bottom one :) I definitely want to cover the side edges, but not sure if I want to ink the front edges or add a work or whirls, or nothing!

Stampbord Dragonfly Pin by Neith


Club Scrap: Ivory Elegance 12/07 - UM Stamps; Centennial 2007 - UM Stamps;
Ampersand Art Supply - Stampbord; Claybord Scratch Knife;
Ranger: Adirondack Ink Pads - Cloudy Blue, Cool Peri, Eggplant, Pink Sherbet, Wild Plum; Archival Ink Pad - Grape; Posh - Silver Accent Pen;

Sunday, May 4, 2008

Ink Your Clay Tutorial

The site where I used to have this tutorial recently went down... So I hunted to find my copy of the original to post here for you! I hope you enjoy!

Ink is for more than just paper and altered arts. Did you know that you can also use your inks to create custom colored polymer clay?
Design Originals has a great book, Clay Techniques to "DYE" for, which teaches you all kinds of ways to use Ranger inks and embossing powders to color your clay, along with over 20 projects. I took inspiration from their coloring techniques to create my own clay blend… which I then used to create a series of tube beads, a pendant, and a six-holed focal spacing bead for a bracelet modeled after Heather Powers Cuff Bracelet from Bead & Button: Beading Basics Essential Techniques and https://www.humblebeads.com/blog/throw-back-thursday-bead-edition
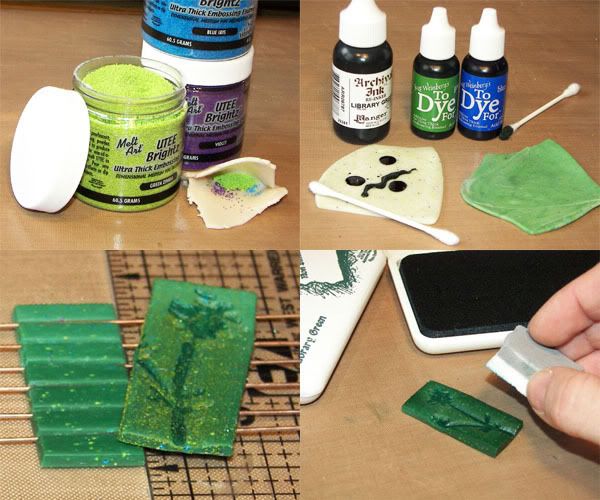
UTEE is wonderful for tinting your clay to a small degree while embedding grit and variability into the piece. Translucent clay will allow the differing levels of color shine through. To tint clay with UTEE, first condition your clay by running it through your clay machine at the thickest setting until it is pliable. Pinch your clay into a pocket and add no more than 2 teaspoons per full bar of clay. Seal the pocket and run it through your clay machine, folding between each run, until the UTEE is evenly dispersed.
Even with UTEE Brightz, the clay will still be light in color when you cure it. So, at this point, you may wish to add dyes to the clay to give it a deeper color. Be sure to put on some gloves for this part because the liquid ink can get messy! Take your conditioned clay and add some drops of Archival Reinkers or To Dye For to the surface of your sheet. Spread it out with a Q-Tip and fold the clay over, keeping the inked surface covered. Run it through the clay machine, at the thickest setting, folding between runs until the color is even.
You may opt to create a faded sheet of clay by merging two colors, or go with just one. Mold your clay as you wish and then you can also color the surface of your piece by stamping on it, pressing additional embossing powders into it, using Adirondack Pigment Pens and Adirondack Dimensional Pearls paints, using Cut n' Dry Foam to apply more Archival Ink, etc. If you have too much clay left over, you may save it or use it to make a series of small beads. Cure according to the instructions on your clay package and marvel over your finished work!
One wonderful thing about using your inks, powders, and stamps to create clay pieces is that you can create gift cards or scrapbook pages with the same materials for a wonderfully coordinating set!
Supplies used on jewelry pieces:
  • Amaco: Bead Baking Rack; Bead Making Tool Set; Polymer Clay & Craft Oven;
  • Bead & Button: Beading Basics Essential Techniques;
  • Beadalon: 10mm Silver Plated Medium Bale;
  • Blue Moon: Memory Wire Bracelets;
  • Club Scrap: 2/07 Refresh Beads; 8/06 Wheel & Sprocket Beads; 1/06 Framed Beads; 5/03 Aromatherapy Borders & Backgrounds Unmounted Stamps;
  • Darice: 2" Nickel Plated Head Pins;
  • Design Originals: Clay Techniques to DYE for;
  • Fire Mountain Gems: 4.5mm Silver Plated Jump Ring; Surgical Steel Fish Hook Ball/Coil Earwire;
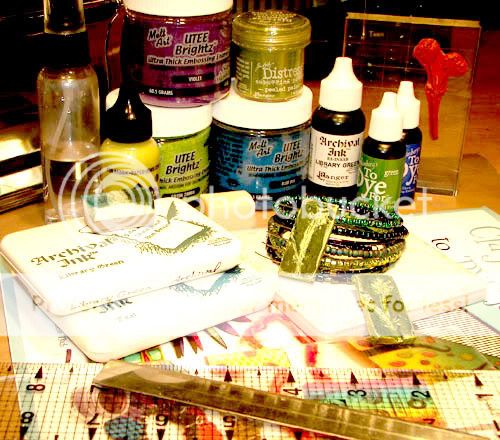
  • Ranger: Adirondack Dimensional Pearls in Lettuce; Archival Ink Pads in Library Green & Teal; Archival Reinker in Library Green; Cut n' Dry Foam; Distress Embossing Powder in Peeled Paint; To DYE For in Blue & Green; UTEE Brightz in Blue Iris, Green Zinnia, & Violet;
  • Sculpey: Translucent Polymer Clay;

Supplies used on card:
  • Club Scrap: 2/07 Refresh Dark Green & Light Green plus Water Mister; 10/06 Farmer's Market Green; 5/06 Painted Desert Stem; 3/04 Culinary Green; 5/03 Aromatherapy Borders & Backgrounds Unmounted Stamps;
  • Krylon: Silver Leafing Pen;
  • Ranger: Adirondack Alcohol Ink Metallic Mixatives in Silver; Adirondack Dimensional Pearls in Lettuce; Archival Ink Pads in Library Green & Teal; Cut n' Dry Foam; Distress Ink Pads in Peeled Paint & Shabby Shutters;

Friday, December 7, 2007

Digital Hybrids and Flash Cards

Still working on kicking the winter colds/flus and my blood pressure drops which come whenever I catch a bug :( But I did manage a few new things :)

The newest is a hybrid of Digital Scrapbooking and actual papers... a simple little jewelry holder for some pieces that I made as gifts! I've put earrings, pendants, and rings in them so far!

Serengeti Digi Jewelry Holders by Neith Juch

Tricia Morris had posted a sample jewelry holder on ClubScrapChat.com and it inspired me to make these new holders with the popout hanger section! I had been using mini gift bags from my Sizzix machine up until now, but I had a few new pendants which were too long for the bags and decided it was time to mix things up a bit!

I used the Serengeti 11/07 CS Digital Kit to create the simple holders (with my contact info on the back as the jewelry designer). The inside is made simply by taking the Yellow print and using the magic wand to select all of the yellow for deletion, then using Enhance >> Adjust Color >> Color Variations in PSE to remove a little green from the piece (since it is printed on the actual greenish-yellow paper I wanted the original background to show through and for the colors to be less distorted). I used the same Color Variations on the outside cover to remove some blue and green (it will make the lion charm appear reddish on your screen but will print truer to the original color on top of your Light Teal paper).

I simply used my X-Acto knife and ruler to cut horizontal lines for the pop out bars and used my bone folder to score vertically at the ends of each pop out section... The Score-It tool did the main folds at the center quite nicely! I also added a little color using Direct To Paper inking with Ranger's Distress Inks in Peeled Paint and Broken China on all of the edges and on the inside of the Light Teal paper wherever it would be visible! These were some very quick and simple holders!

I also wanted to share a few of the Korean language flash cards that I've begun for my kids! When I am ready to print a large batch they'll be printed on photo paper with the edges inked and matted on cardstock... possibly even laminated, I haven't decided!

Kee Reen Korean Language Flash Card by Neith Juch


Ko Ggi Ri Korean Language Flash Card by Neith Juch


Ol Ruk Mal Korean Language Flash Card by Neith Juch


Saja Korean Language Flash Card by Neith Juch


I adored the animal stamps/transparencies from the Serengeti 11/07 Club Scrap Kits and really wanted to incorporate them into these cards with some zoo photos (yeah, I need to get a better zebra shot!). To do so, I used the paintbrush tool with a very soft brush to color a layer underneath the transparencies and erased most places where I went outside of the lines, maintaining a little bit of a transparent look to the finished pieces. I used the brush in the same colors to fill in the romanized version of each Korean word by making a text layer, simplifying the layer, selecting the area the layer took up, then opening a new layer and painting into my selection with the brush.

I also die cut the Korean font out of other papers from the kit and stretched and altered some of the transparency images to make frames or mattes for my photographs. On the Zebra card, I used the same transparency for the three accent squares and then stretched it for my photo frame, erasing the lines inside of the box.

On the lion card, I made ready use of the pattern making tips from the Serengeti 11/07 DigiRap. I also used the same Color Variations to alter the lion charm, and even used the burn technique from the Great Outdoors 10/07 DigiRap!

I know that they aren't too complicated... But I am planning to print them out at about the size of a license since I have the perfect laminating pouches for that size and also some playing card box kits from Club Scrap, way back to Wild Wild West 10/05!

Wednesday, May 16, 2007

Collections Beaded Necklace & DigiLayout

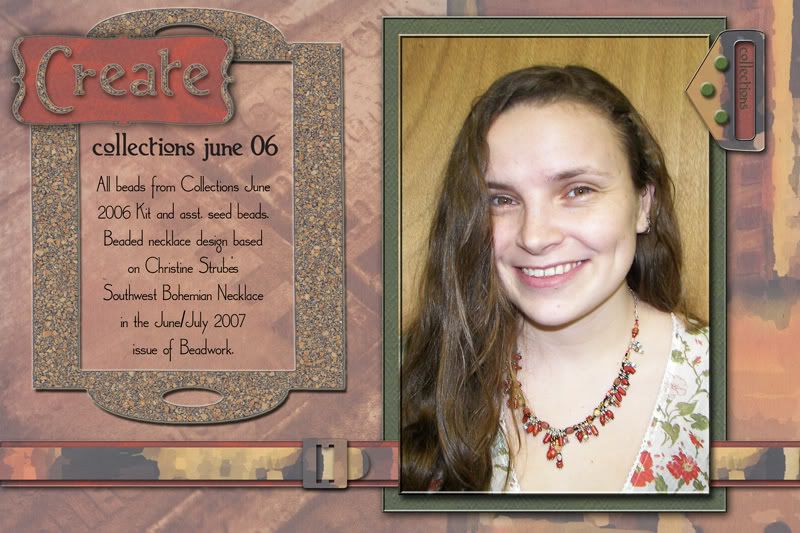
Something hit me when I saw Christine Strube's Southwest Bohemian Necklace in the June/July 2007 Beadwork Magazine and I just knew that I had to use the base design to create my own necklace! I changed things around a bit in order to make it work with my Club Scrap Collections June 2006 Beads, whipped it together while the kids were at school, and love the end result!

Club Scrap Collections June 2006 Beaded Necklace and DigiLayout by Neith

All beads are from Club Scrap Collections June 2006 Kit, with the addition of some simple seed beads and findings from Blue Moon Beads. All digital layout components are from the same month's Club Scrap DigiGoodies Kit along with Landsdowne font and Photoshop Elements effects including Inner Ridge Bevels, Drop Shadows, Outer Glows, and Strokes. Some hues have been altered to coordinate better with the photo and elements have been stretched!

Saturday, April 14, 2007

Mini Badge Book


I love the idea of creating Mini Badge Books! These books are the perfect size for carrying in your purse and have ID badge holders acting as page protectors! This quick little book is just one way to fill a Mini Brag Book!

Mini Brag Book by Neith
Mini Brag Book by NeithMini Brag Book by Neith
Mini Brag Book by Neith


Supplies Used, all from Club Scrap:
  • Stratosphere 4/07 - Dark Blue, Fucshia, Green, & Light Blue papers;
  • Refresh 2/07 - Sr Light Green 12x12 Print, Dark Blue, Dark Green, & Light Blue papers; CSt UM Stamps; Club Scrap DigiDeluxe Kit;
  • Fizz 1/07 - Borders & Backgrounds UM Stamps; CSt Crazy About Fizz UM Stamps;
  • Ivory Elegance 12/06 - Dark Brown paper;
  • Farmer's Market 10/06 - Club Scrap DigiGoodies Kit;
  • Wheel & Sprocket 8/06 - Borders & Backgrounds UM Stamps;
  • Surf's Up! 7/06 - Salmon Hibiscus Print;
  • Collections 6/06 - Saddle Brown paper;
  • Nature's Wonders 5/06 - Mango paper;
  • Musical Interlude 12/05 - Maroon paper;
  • The Written Word 11/05 - Medium Blackberry paper;
  • Down to Earth 4/05 - Brown paper;
  • Textiles & Notions 9/04 - Sr Rule Stamp; CSt Ironing Board Grid Stamp; Stewart Superior Palette Ink Pad in Noir Black;
  • Ranger Adirondack Ink Pads in Bottle, Ginger, Lettuce, Purple Twilight, Red Pepper, & Watermelon;
  • Ranger Archival Ink Pad in Cobalt;

Tuesday, February 27, 2007

Ink Your Clay! New Tutorial!

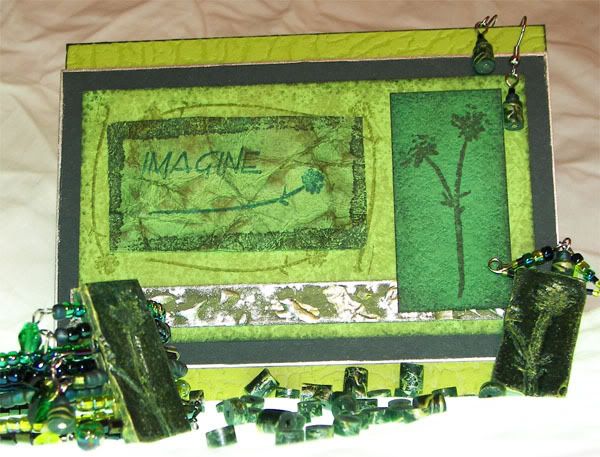
Imagine Card and Jewelry Set

Imagine what you can create when you take the same inks off of your cards and layouts and add them to piece of clay! Learn how to create the jewelry set on this page at moved to this blog, click to get to the post!

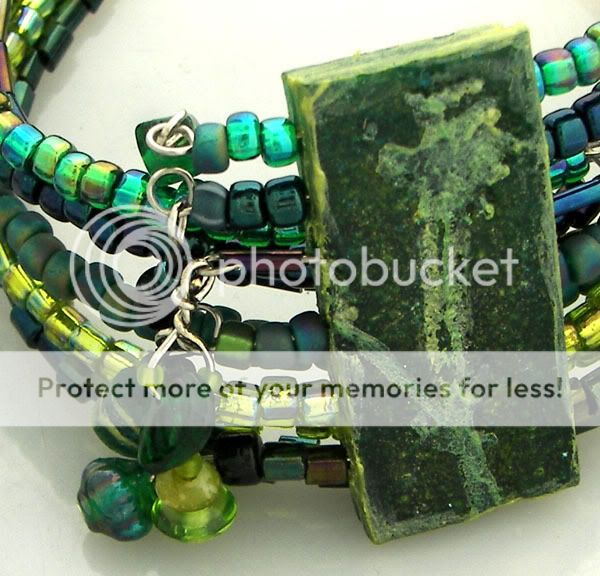
Refresh Cuff Bracelet, Dangles Detail

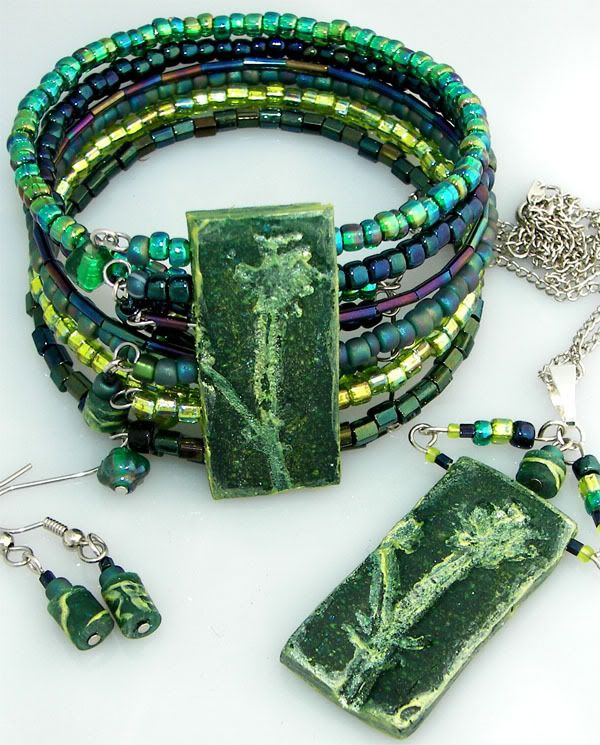
I have a new tutorial up at moved to this blog, click to get to the post that teaches you some of the many ways that you can add ink and embossing powder to polymer clay for your creations! There are also tutorials by me that go over how to Watercolor With a Waterbrush and the Stenciling Revisited class!

Refresh Cuff Bracelet, Pendant, and Earrings

Supplies used on jewelry pieces:
  • Club Scrap: 2/07 Refresh Beads; 8/06 Wheel & Sprocket Beads; 1/06 Framed Beads; 5/03 Aromatherapy Borders & Backgrounds Unmounted Stamps;
  • Ranger: Adirondack Dimensional Pearls in Lettuce; Archival Ink Pads in Library Green & Teal; Archival Reinker in Library Green; Cut n' Dry Foam; Distress Embossing Powder in Peeled Paint; To DYE For in Blue & Green; UTEE Brightz in Blue Iris, Green Zinnia, & Violet;
  • Amaco: Bead Baking Rack; Bead Making Tool Set; Polymer Clay & Craft Oven;
  • Bead & Button: Beading Basics Essential Techniques;
  • Beadalon: 10mm Silver Plated Medium Bale;
  • Blue Moon: Memory Wire Bracelets;
  • Darice: 2" Nickel Plated Head Pins;
  • Design Originals: Clay Techniques to DYE for;
  • Fire Mountain Gems: 4.5mm Silver Plated Jump Ring; Surgical Steel Fish Hook Ball/Coil Earwire;
  • Sculpey: Translucent Polymer Clay;
Supplies used on card:
  • Club Scrap: 2/07 Refresh Dark Green & Light Green plus Spritzer Bottle; 10/06 Farmer's Market Leaf; 5/06 Painted Desert Embossed Stem; 3/04 Culinary Green; 5/03 Aromatherapy Borders & Backgrounds Unmounted Stamps;
  • Krylon: Silver Leafing Pen;
  • Ranger: Adirondack Alcohol Ink Metallic Mixatives in Silver; Adirondack Dimensional Pearls in Lettuce; Archival Ink Pads in Library Green & Teal; Cut n' Dry Foam; Distress Ink Pads in Peeled Paint & Shabby Shutters;

Tuesday, January 16, 2007

Stamping Meets Beading & Crochet!

Club Scrap Collections Beads; Club Scrap Fossils Stamp, Mica, & Bottle; Sculpey Clay; Beachcombed Items; Jewelry Wire & Gold Seed Beads

I've been really enjoying beading lately and wanted to throw more scrapping supplies into the mix! What better way than to add stamped polyclay beads and an altered tin to present a gift of jewelry in? This gift does just that while also bringing in a seasonal beach theme to my poor Caribbean friend who is living here in New England now and suffering through our winter!

I created my own faded sheet of Sculpey III Clay ranging from light to dark shimmering blue, with a little bit of Ranger Adirondack Denim Embossing Powder added to it for grittiness and shimmer! After it was rolled out, I also used the Club Scrap Fossils 08/04 Nautilus Collage Stamp with Ranger Cobalt Archival Ink before curing the clay on my Altoid lid! I also spray painted the bottom of the Altoid tin and used some spray on webbing on top of the base color!

I decorated the cover of the tin with an uneven corner piece made from beaded wire that I crocheted along with some locally found seashells and sea glass as well as the Club Scrap Fossils 8/04 Artquest Mica plus Club Scrap Surf's Up! 7/06 Drilled Shell and Glass Bottle filled with my own shells, sea glass, and a few of the beads used in the project.

Club Scrap Collections Half-Crochet Twisted Strands and Wheel & Sprocket Triple Crochet Braided NecklaceI used the left-over clay from my box to create 7mm Tube Beads with the Amaco Tube Bead Roller Set #1. I then rolled the uncured clay tube across the same inked Nautilus Collage Stamp and proceeded to sure the beads. I made rough cuts with my blade in order to keep the look and feel more rustic... if you wait til the clay is partially cooled, the randomness will occur more naturally!

On my friend's necklace, I used Club Scrap's Collections 6/06 Embellishment Pack Beads with approximately 2 2/3 yards of 24 gauge copper wire (Hirschberg, Schutz & Co) my handmade clay beads, and some translucent gold seed beads that I crocheted together into a single chain with a USF5/3.75mm crochet hook. The end strand measured about 21-22" long. I also took a matching length strand of the non-clay beads that were simply added to a length of the same wire, and then I twisted them together before adding a handmade 1.5" copper wire clasp and eye hook. The end result is a 19.5-20" necklace!

Of course, my daughters were jealous! So I needed to make a necklace for them! The top piece to the left is an unfinished and not fully twisted necklace that I made with some of the remaining Collections 6/06 Embellishment Pack Beads, Red 20 gauge Darice Craft Wire, red E beads, and some red, teal, and light blue seed beads.

And, could I be left out of the mix? No! I made myself the lower necklace, to the right, by braiding together three crocheted strands of Wheel & Sprocket 8/06 Beads, some black seed beads, and Black 20 gauge Darice Craft Wire.

When you crochet with wire, make sure your wire is pliable and thin enough. Each time that you draw a new loop through, have a larger bead between the existing chain and your crochet hook. Alone, this will create a strand where you only have beads on one of three sides of your chain . . . I recommend having some small beads (seed or slightly larger) that you push onto the newly formed loop before you draw a new loop through. To prepare for this, take your wire (I used 2 2/3 yd per adult necklace strand when doing a 2 strand twisted necklace, you'll need to adjust the length based on how tightly you crochet) and string beads onto it to fill about the length that you want your finished strand to be, and a little extra for good measure! You may want to put on one larger bead with two smaller ones between each large bead . . . or pick a large number of random beads that are all small enough to force onto your loops through the existing chain!

Braiding three crochet strands together allows for more uneven crocheting to be covered up... after you braid, shape your necklace and use your fingers to smoosh any ungainly loops back into the body of the necklace! Enjoy!

Half Crochet Twisted Necklace Strands

Saturday, January 6, 2007

Beaded Chain Necklaces

Each and every month there is both a new full Portion Cup of Beads and an Embellishment and Bead Pack to coordinate with the month's kit! They usually come with plenty of beads in this particular size range and a wonderful color arrangement!

Why not create some simple Beaded Chain Necklaces and Bracelets from them? Or, better yet, let me teach a jewelry workshop for you! A full, adult-sized necklace can take up to 2 hours, but a bracelet can go quicker and leave everyone with the skills and the supplies to make many more!

Here are a few examples of them, using only beads from the kit, wire, and occasional charms or findings from the local craft shop!

Childs Necklace CS Fizz 1/07 by Neith Juch


On the Fizz January 2007 Child's Necklace, I created my own, off centered, heart-shaped link to match the prints and stamps from the kit and will be giving it to my daughters with a matching Valentine's Day card!

This Interior Designs November 2006 Butterfly Necklace uses larger beads, roughly matched for size and color with the bead on the opposite side of the chain . . . There's no reason to limit yourself to just one size or shape of beads!


This Ivory Elegance December 2006 necklace uses plastic wrapped FunWire salvaged from a beaded reindeer ornament kit! The end result is that it matches an outfit of mine perfectly and has a wonderful and unique look!


On this Wheel & Sprocket August 2006 Red Hatter necklace, I had a lot of fun creating the pendant! The beads are a clearer bright red and deep purple, but with the triple looped finding that I created, all that I can see is a wonderfully curvy woman with her arms swinging as you move!

There are countless ways to use a beaded chain like this... add focal beads or pendants that you buy or create, use multiple strands, add charms to each link for a fun bracelet, etc! Even coordinating earrings!